PySceneDetect 中场景检测器
主要包括:
ContentDetector,ThresholdDetector,AdaptiveDetector的算法及参数含义、算法思想以及如何确定这些参数。
通用概念
- 场景 (Scene): 一系列连续的、在视觉上或叙事上构成一个单元的镜头。
- 切点 (Cut/Scene Break): 两个不同场景之间的边界。
- 帧间差异 (Frame-to-Frame Difference): 检测器通常通过比较连续(或间隔的)视频帧之间的差异来识别潜在的切点。差异的计算方式因检测器而异。
- 阈值 (Threshold): 一个预设的数值。当计算出的帧间差异超过这个阈值时,检测器就认为可能发生了一个场景切换。
- 最小场景长度 (Min Scene Length /
min_scene_len): 检测到的场景必须达到的最短持续时间(通常以帧数或时间码表示)。如果两个检测到的原始切点之间的距离小于这个值,它们可能会被合并,以避免产生过多非常短的、无意义的场景片段。为了分析和找到最佳检测参数,我们通常将这个值设为1帧,以观察检测器最原始的输出。
算法概述
1. ThresholdDetector (阈值检测器)
主要检测淡入淡出到黑屏或白屏场景
-
命令:
detect-threshold -
核心思想: 主要通过监测视频帧的平均亮度/强度是否跨越一个固定的阈值来判断淡入/淡出事件。它假设场景切换(特别是淡入淡出)会伴随着画面整体变亮或变暗到某个程度。
-
主要参数及其含义:
-
threshold(或-t VAL):- 含义: 一个 0-255 之间的整数(或浮点数)。这是判断画面是否进入“淡出”或“淡入”状态的亮度基准。
- 算法交互: 与
method参数配合使用。 - 如何确定:
- 使用亮度分析工具 (如我们之前编写的
analyze_brightness.py):查看你的视频在发生淡入淡出到“黑屏”或“白屏”时,那些“黑/白”帧的实际平均亮度值。 - 如果使用
method = FLOOR(检测淡出到暗/从暗淡入):threshold应略高于视频中“黑屏”状态的平均亮度。例如,如果黑屏亮度在 2-5 之间,你可以尝试threshold = 5或8或10。如果阈值设得太低(比如1),那么只有几乎纯黑的帧才会被识别。 - 如果使用
method = CEILING(检测淡出到亮/从亮淡入):threshold应略低于视频中“白屏”状态的平均亮度。例如,如果白屏亮度在 250-253 之间,你可以尝试threshold = 250或245。 - 实验法: 从一个相对宽松的值开始(例如,对于 FLOOR 方法,从 15-20 开始;对于 CEILING,从 230-240 开始),然后逐渐向更严格的值调整(FLOOR 向下调,CEILING 向上调),同时观察
save-images的结果。
- 使用亮度分析工具 (如我们之前编写的
-
fade_bias(或-f PERCENT):- 含义: 一个百分比值(命令行是 -100 到 100,Python 类内部是 -1.0 到 +1.0)。它调整检测到的淡入淡出切点的精确位置。
- 算法交互: 当检测器识别到一次亮度从阈值一侧跨越到另一侧(例如,从高于阈值变为低于阈值,再恢复到高于阈值,这构成一次淡出再淡入),
fade_bias决定切点放在这个过程的哪个阶段。- 命令行
-100(Python-1.0): 切点尽可能靠近完全淡出到黑/白的时刻,或者刚开始从黑/白恢复的时刻(取决于具体实现和淡入/淡出方向)。 - 命令行
0(Python0.0): 切点放在淡出和淡入过程的中间。 - 命令行
+100(Python+1.0): 切点尽可能靠近刚开始淡出或完全淡入完成的时刻。
- 命令行
- 如何确定:
- 通常对于视频间的切换,我们希望在画面完全变黑/白之后,或者刚开始有新画面时进行切割。所以一个中等到较大的负偏置(例如命令行的
30到70,对应 Python 的(PERCENT/50.0) - 1.0)可能是合适的,这会使切点更倾向于“黑场”的边缘。 - 实验法: 设置一个基础的
threshold,然后尝试不同的fade_bias值(例如 -80, -50, 0, 50, 80),观察save-images中切点图片的位置,看哪个最符合你的期望。
- 通常对于视频间的切换,我们希望在画面完全变黑/白之后,或者刚开始有新画面时进行切割。所以一个中等到较大的负偏置(例如命令行的
-
method(Python 类参数,ThresholdDetector.Method.FLOOR或ThresholdDetector.Method.CEILING):- 含义: 定义了如何将帧的平均亮度与
threshold进行比较来触发事件。FLOOR: 当帧亮度低于 (falls below)threshold时,认为是淡出(到暗);当从低于状态恢复到高于等于threshold时,认为是淡入(从暗)。CEILING: 当帧亮度高于 (rises above)threshold时,认为是淡出(到亮);当从高于状态恢复到低于threshold时,认为是淡入(从亮)。
- 如何确定:
- 如果你的视频主要是淡入淡出到黑色,或者从黑色淡入,选择
FLOOR。 - 如果你的视频主要是淡入淡出到白色,或者从白色淡入,选择
CEILING(并配合非常高的threshold)。 - 你的
config.ini中method = FLOOR(因为FRAME_AVERAGE会回退到FLOOR),所以当前是针对暗场景的。
- 如果你的视频主要是淡入淡出到黑色,或者从黑色淡入,选择
- 含义: 定义了如何将帧的平均亮度与
-
min_scene_len(或-m TIMECODE,命令行是-m 1表示1帧):- 含义: 最小场景长度。
- 如何确定: 为了分析检测器的原始性能和找到最佳的
threshold/fade_bias,始终将其设置为1(或1f,根据具体命令格式)。在确定了最佳检测参数后,如果需要避免过多短片段,再在最终处理时考虑增大这个值。
-
2. ContentDetector (内容检测器)
-
命令:
detect-content -
核心思想: 通过比较连续帧之间视觉内容的整体差异来检测场景切换。它不仅仅看亮度,还会考虑颜色分布(色调 Hue, 饱和度 Saturation)和可能的边缘信息。对于平均亮度变化不大但内容发生显著改变的切换(如交叉淡化、某些快速剪辑)通常更有效。
-
主要参数及其含义:
-
threshold(或-t VAL):- 含义: 一个浮点数,表示帧间内容差异的阈值。这个差异值是综合了色调、饱和度、亮度(以及可能有的边缘)通道的变化计算出来的。
- 算法交互: 当计算出的帧间内容综合差异值超过此阈值时,触发切点。
- 如何确定:
ContentDetector的阈值范围和敏感度与ThresholdDetector不同。默认值通常在 20-35 之间。- 较低的阈值意味着更敏感。 对于平滑的交叉淡化或细微的内容变化,你可能需要将阈值降低到 15-25,甚至更低(5-15)。
- 实验法是关键:
- 使用
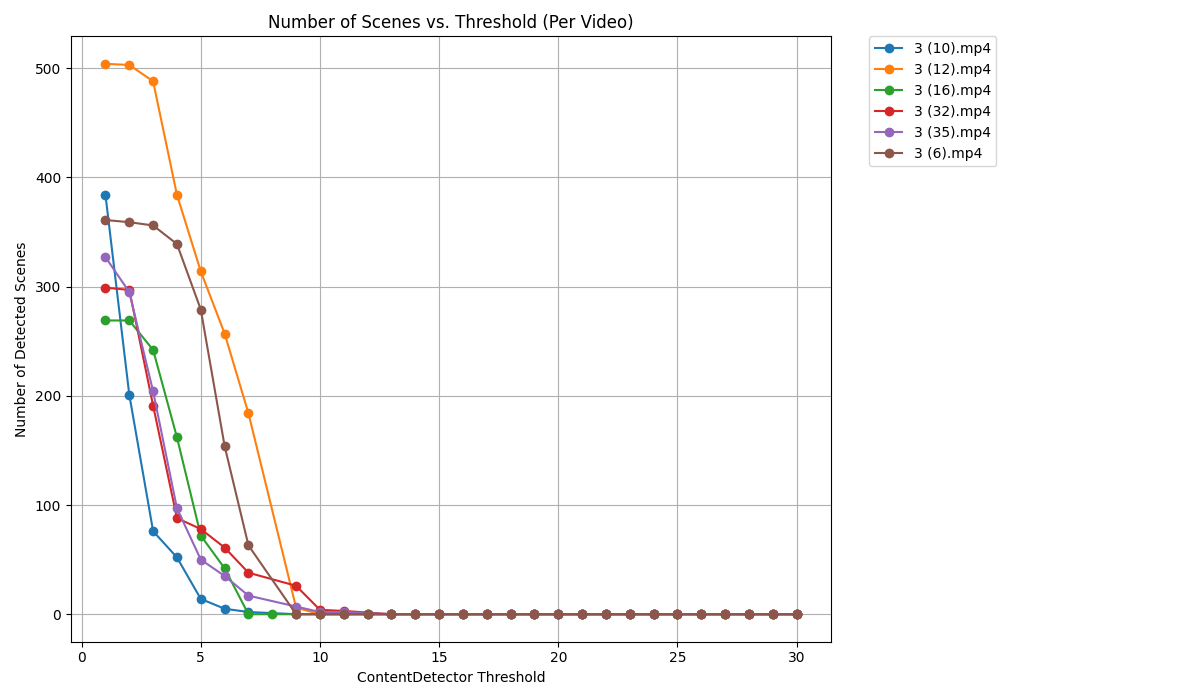
threshold_explorer.py工具(代码见后):这是最系统的方法。设定一个阈值范围(例如,从 5.0 到 30.0,步长 1.0 或 2.0),对抽样视频运行。 - 观察图表: 查看“平均场景数 vs. 阈值”图。寻找曲线的“拐点”——即阈值再降低,场景数开始急剧增加(可能引入噪声);或者阈值再升高,场景数急剧减少(可能遗漏切换)的那个临界区域。
- 结合
save-images: 对于你在图表上找到的几个有希望的阈值点,使用--save_images_for选项(在threshold_explorer.py中)或直接用scenedetect命令行工具(配合save-images)来实际查看这些阈值下的切点图片。人工判断这些切点是否符合你对交叉淡化或其他场景切换的定义。
- 使用
- 从一个相对保守的值开始(例如 25-30),如果检测不到足够的场景,逐渐降低阈值,并观察结果。
-
min_scene_len(或-m TIMECODE,命令行通常是-m 1表示1帧):- 含义: 最小场景长度。
- 如何确定: 同
ThresholdDetector,在参数探索阶段,始终将其设置为1。
-
weights(Hue, Saturation, Luma, Edges - Python 类参数):- 含义: 定义在计算帧间内容差异时,色调、饱和度、亮度、边缘这几个分量各自所占的权重。
- 算法交互: 影响最终的综合差异值。
- 如何确定:
- 通常从默认权重开始。 PySceneDetect 的默认权重是经过一定调优的。
- 如果默认权重效果不佳,并且你对视频内容的特性有了解:
- 如果场景切换主要体现在颜色变化上(例如,从冷色调场景交叉淡化到暖色调场景),可以尝试增加
weights_hue和weights_saturation的权重,同时减少weights_luma的权重。 - 如果场景切换主要体现在结构或物体轮廓变化上,确保边缘检测被启用并且
weights_edges有合适的权重。 - 这部分调整通常需要更多的实验和对视频内容的细致分析。你的
config.ini和scene_detector.py允许你设置这些权重。
- 如果场景切换主要体现在颜色变化上(例如,从冷色调场景交叉淡化到暖色调场景),可以尝试增加
-
luma_only(布尔值):- 含义: 如果为
true,则在计算内容差异时只考虑亮度通道,忽略色调和饱和度。 - 算法交互: 相当于将
weights_hue和weights_saturation设为 0。 - 如何确定:
- 对于颜色信息丰富且对场景区分很重要的视频(尤其是交叉淡化),通常应将此设为
false(默认)。 - 如果视频是黑白的,或者颜色信息干扰性强且不重要,可以设为
true。
- 对于颜色信息丰富且对场景区分很重要的视频(尤其是交叉淡化),通常应将此设为
- 含义: 如果为
-
3. AdaptiveDetector (自适应检测器)
-
命令:
detect-adaptive -
核心思想: 与
ContentDetector类似,它也计算帧间内容的差异。但不同之处在于,它不是使用一个固定的全局阈值,而是根据最近一段视频窗口内的帧间差异动态地计算一个自适应阈值。当某一帧的差异显著高于这个动态计算出的局部平均差异时,触发切点。 -
适用场景: 对于视频整体亮度或内容变化幅度不一致的情况可能有用。例如,一个视频可能有些部分变化剧烈,有些部分变化平缓。固定阈值可能难以同时适应这两种情况。
-
主要参数及其含义:
-
adaptive_threshold(或-t VAL):- 含义: 一个乘数因子(通常是较小的浮点数,例如 2.0-5.0,默认可能是 3.0)。
- 算法交互: 检测器会计算一个基于滑动窗口的帧间差异的统计量(例如平均值或移动平均值)。如果当前帧的差异超过了这个统计量乘以
adaptive_threshold,则认为是一个切点。值越大,检测越不敏感(需要更大的相对变化)。 - 如何确定:
- 实验法: 从默认值(例如 3.0)开始。
- 如果检测到的场景太少,尝试降低此值(例如 2.5, 2.0)。
- 如果检测到的场景太多(噪声),尝试增加此值(例如 3.5, 4.0)。
- 同样,结合
save-images进行人工检查。
-
min_scene_len(或-m TIMECODE):- 含义: 最小场景长度。
- 如何确定: 同上,参数探索阶段设为
1。
-
window_width(或--window_width VAL, 帧数):- 含义: 用于计算自适应阈值的滑动窗口的宽度(以帧为单位)。如果为 0,检测器通常会根据视频帧率自动设置一个合理的窗口大小。
- 算法交互: 窗口越大,自适应阈值对局部快速变化的敏感度越低,对较长时间的平均变化更敏感。窗口越小,对局部突变越敏感。
- 如何确定:
- 通常可以从默认值 (0,即自动) 开始。
- 如果自动设置效果不佳,可以根据视频的平均镜头长度或变化节奏来手动设置。例如,如果快速剪辑多,可以尝试较小的窗口;如果长镜头多,可以尝试较大的窗口。
-
min_delta_hsv(浮点数 0-255):- 含义: 有些版本的
AdaptiveDetector可能使用这个参数。它设定了一个帧间 HSV(色调、饱和度、亮度)差异的最小绝对值。即使相对差异(通过adaptive_threshold判断)很大,但如果绝对差异本身非常小(例如,在几乎全黑的场景中微小的噪声变化),也可能不被视为切点。这有助于过滤掉在非常低对比度区域的噪声。 - 如何确定:
- 如果你的视频中有非常暗或对比度非常低的区域,并且
AdaptiveDetector在这些区域产生了误报,可以尝试增加此值(例如从默认的 10-15 增加到 20-25)。
- 如果你的视频中有非常暗或对比度非常低的区域,并且
- 含义: 有些版本的
-
通用参数确定流程:
-
选择检测器类型:
- 淡入淡出到黑/白: 优先尝试
ThresholdDetector。 - 交叉淡化、内容变化明显但亮度变化不大: 优先尝试
ContentDetector。 - 视频内容变化特征不一致,难以用固定阈值把握: 可以尝试
AdaptiveDetector。 - 不确定或想组合使用: 可以使用
MultiDetector,并分别配置上述检测器(在你的config.ini中将[SceneDetectorSetup]的detector_type设为MultiDetector,然后在各个检测器的配置节中设置enabled = true和相应的参数)。
- 淡入淡出到黑/白: 优先尝试
-
设置
min_scene_len = 1: 在寻找最佳检测参数的阶段,始终这样做。 -
选择一个(或几个)代表性的抽样视频: 这些视频应该包含你期望检测到的各种场景切换效果。
-
对于选定的检测器,系统地扫描其主要阈值参数:
ThresholdDetector: 扫描threshold和fade_bias。ContentDetector: 主要扫描threshold。可以后续再调整weights。AdaptiveDetector: 主要扫描adaptive_threshold。可以后续再调整window_width。- 使用你的
threshold_explorer.py工具 (如果它是针对ContentDetector的,你需要为其他检测器做类似的参数扫描逻辑,或者修改它使其更通用)。
-
可视化和人工检查:
- 查看场景数量随阈值变化的图表。
- 对于几个有希望的阈值设置,使用
save-images生成的图片进行人工检查,看切点是否准确、是否有漏检或误报。
-
迭代和微调: 根据可视化和人工检查的结果,调整参数范围,进行更细致的扫描,或者尝试调整次要参数(如权重、窗口宽度等)。
-
选择“最佳”参数: “最佳”通常是在“召回率”(找到所有想找的切换)和“精确率”(找到的切换都是正确的)之间的一个平衡。这取决于你的具体需求。可能没有一组参数对所有视频都完美,你可能需要根据视频类型选择不同的参数集,或者接受一定的折衷。
可视化确定内容检测阈值方法
内容检测器阈值参考代码
1 | import csv |
亮度参数选定方法参考代码
1 | import cv2 |
阈值选择方法
查看 avg_scenes_vs_threshold.png 图。通常,你会寻找一个点,在该点之后,进一步降低阈值会导致场景数量急剧增加(可能引入过多噪声或非期望的切点),或者在该点之前,提高阈值会导致场景数量急剧减少(可能遗漏真实切点)。一个“平稳”的区域或者一个明显的“拐点”可能是好的候选范围。
对于你在图表上选出的几个候选阈值
- 可视化阈值选择工具使用方法
1 | python threshold_explorer.py "/Volumes/shared/czq/video/scene-detect/淡入淡出-result/无转场-result/无转场/无转场/无转场/无转场/无转场/无转场/无转场/无转场/无转场" \ |
- 亮度检测工具使用方法
1 | python analyze_brightness.py '/Volumes/shared/czq/video/scene-detect/淡入淡出-result/无转场-result/无转场/无转场/无转场/无转场/无转场/无转场/无转场/无转场/无转场/3 (15).mp4' |
结果显示
如图
- 平均阈值

- 检测视频所有阈值
1 | 2025-05-14 19:17:47,588 - INFO - --- 阈值选择建议 --- |