基于ESP32-CAM的智能猫眼实现
Published in:2024-10-27 |
Words: 8.8k | Reading time: 44min | reading:

基于ESP32-CAM的智能猫眼实现

简介

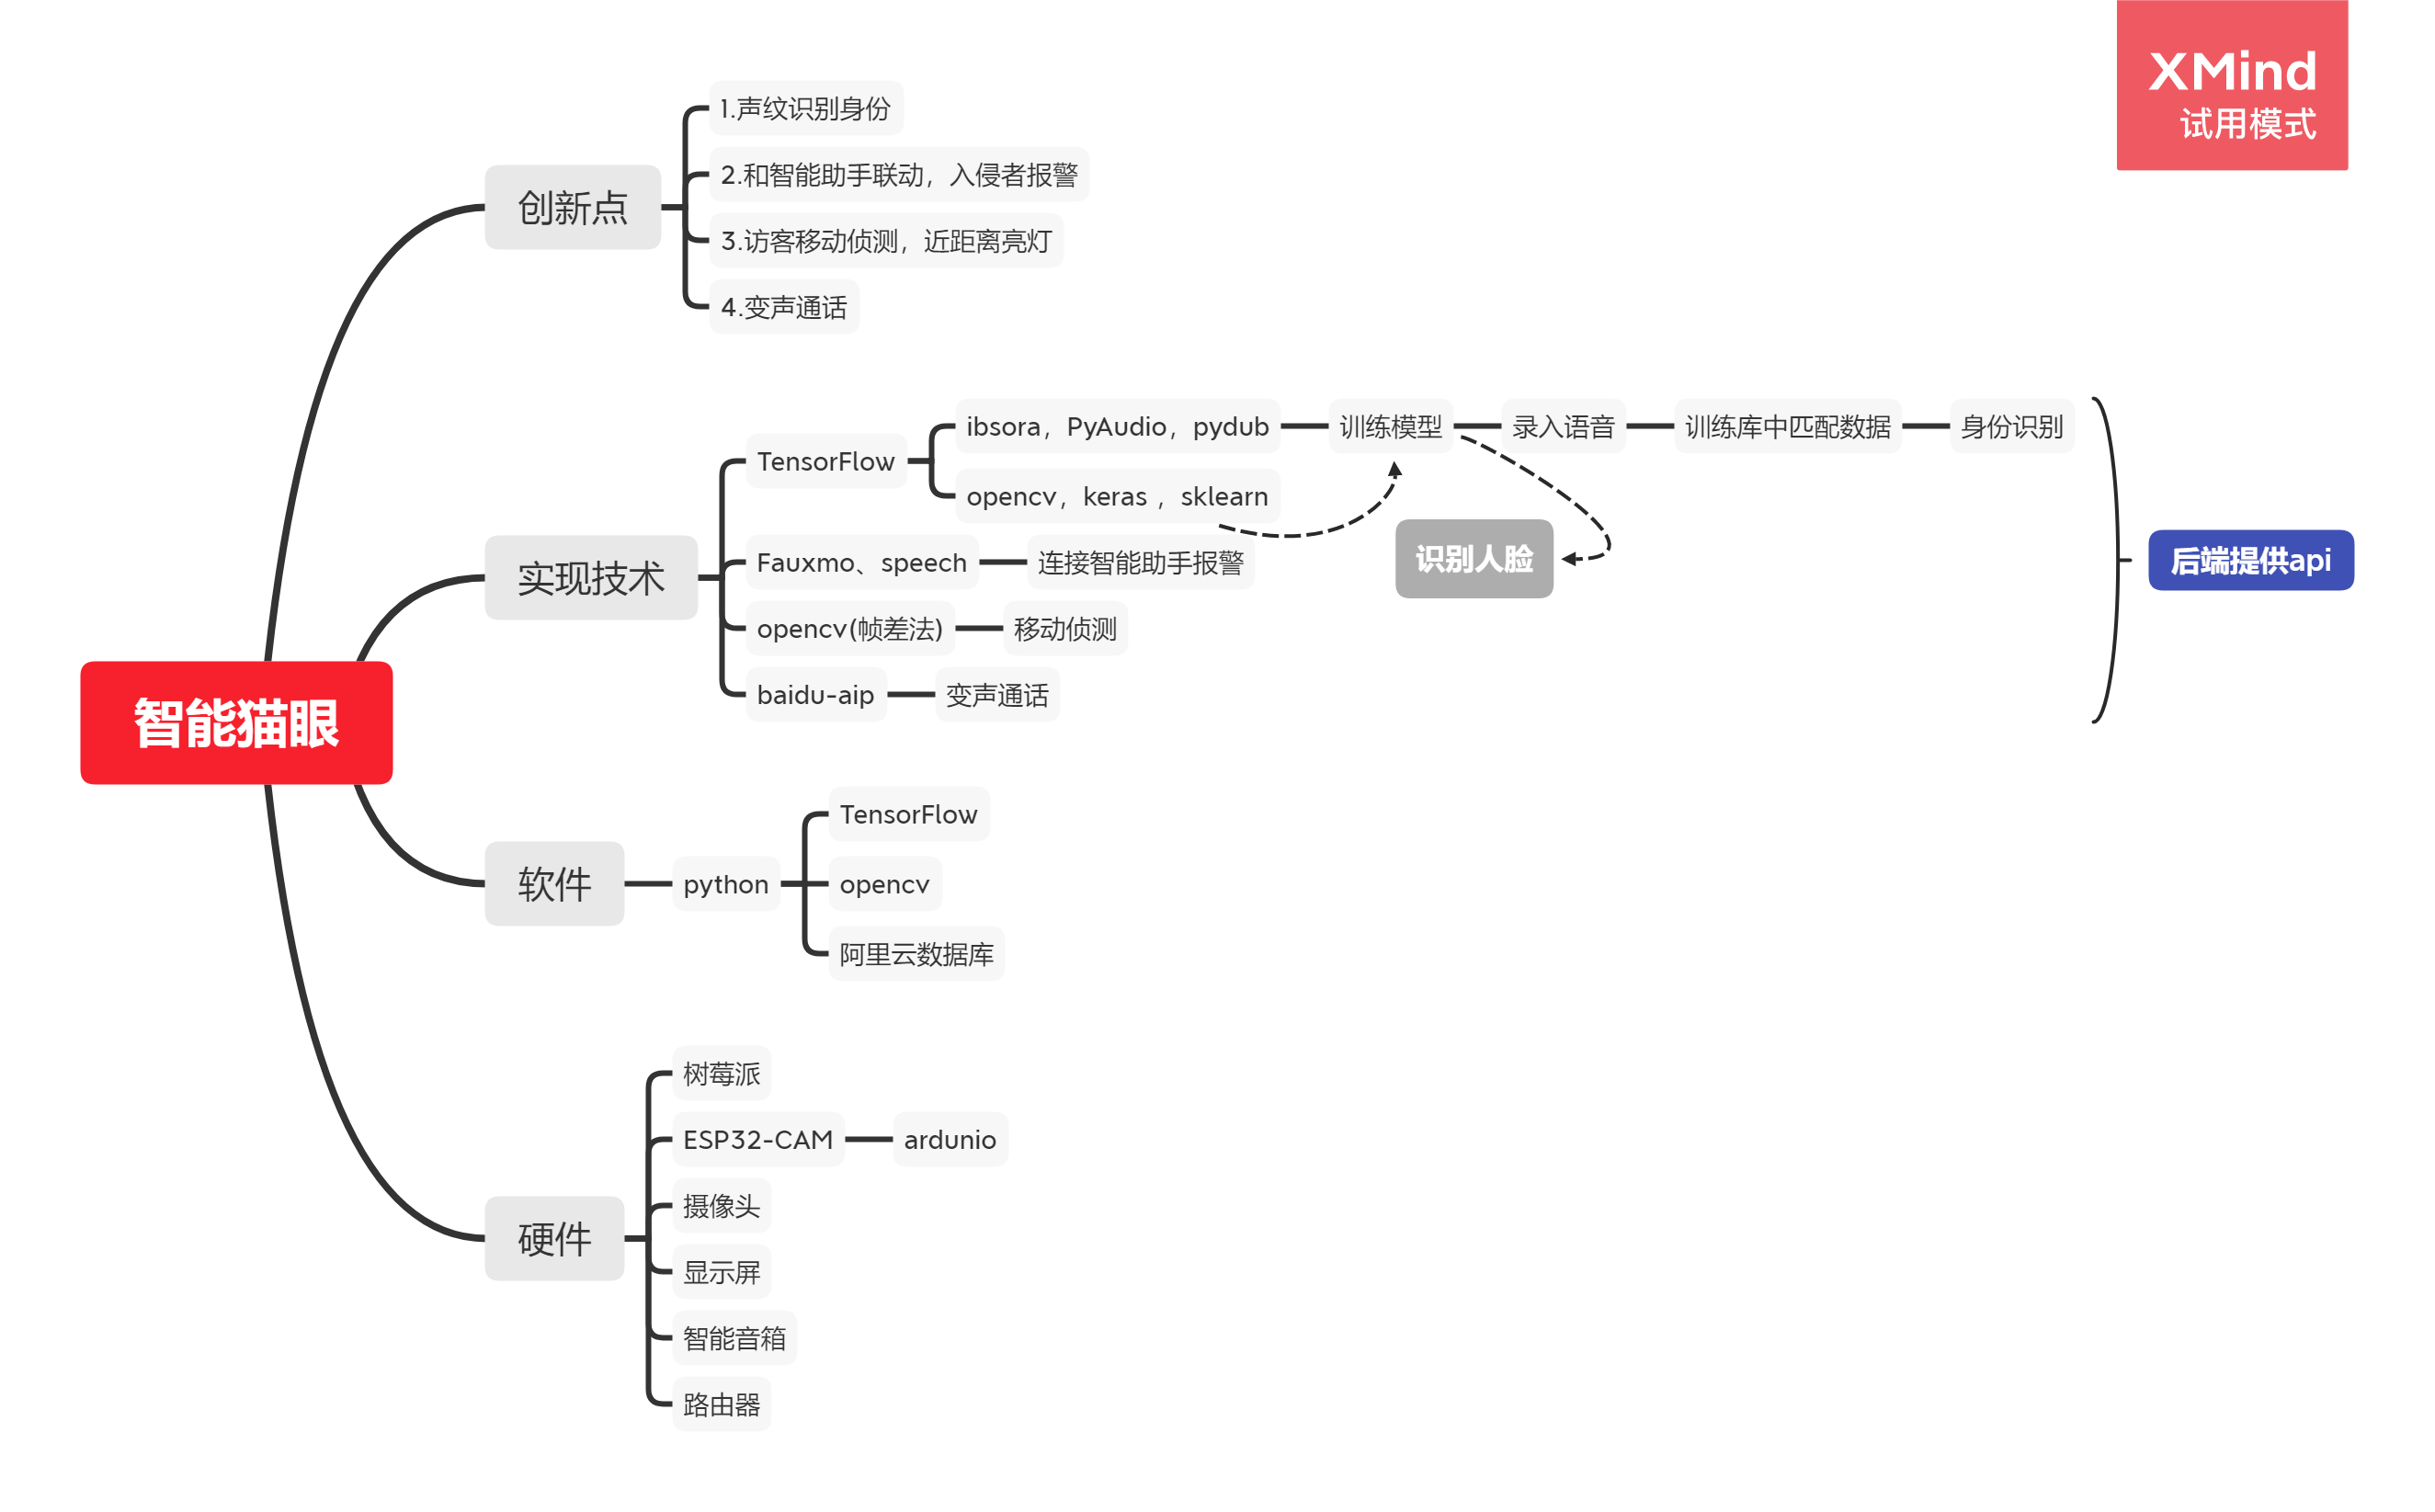
  • 项目简介

用python和Tensor Flow进行人脸识别,通过语音识别模块进行语音识别

img

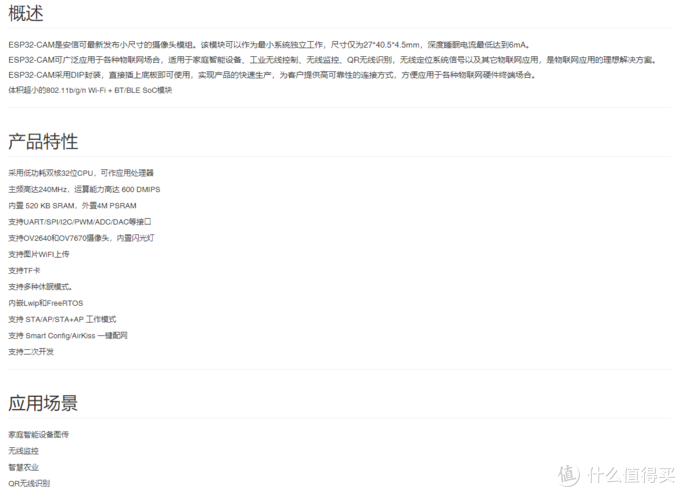
  • 硬件简介

img

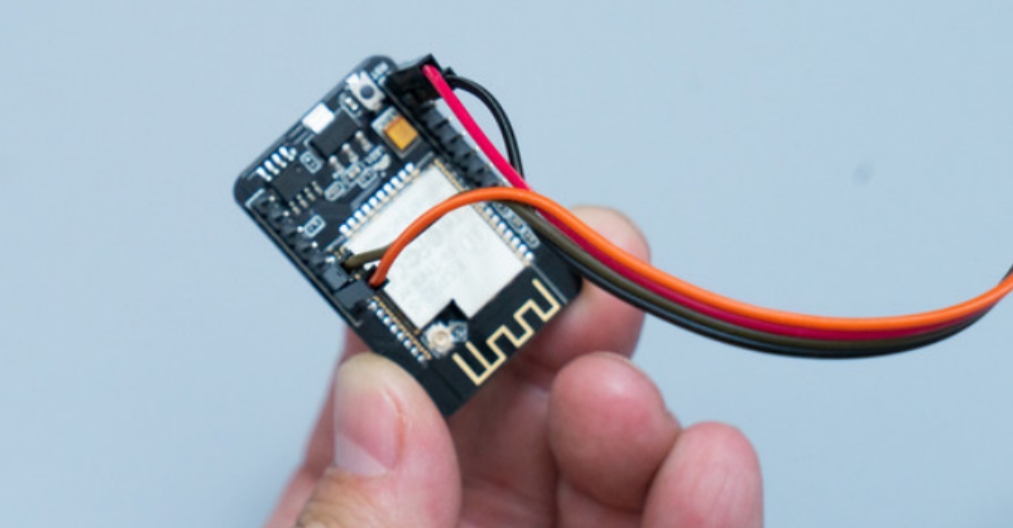
如图,模块包含一块ESP32-CAM的MCU和一个OV2640的200W像素摄像头,ESP32-CAM除了支持OV2640外还支持OV7670摄像头

img

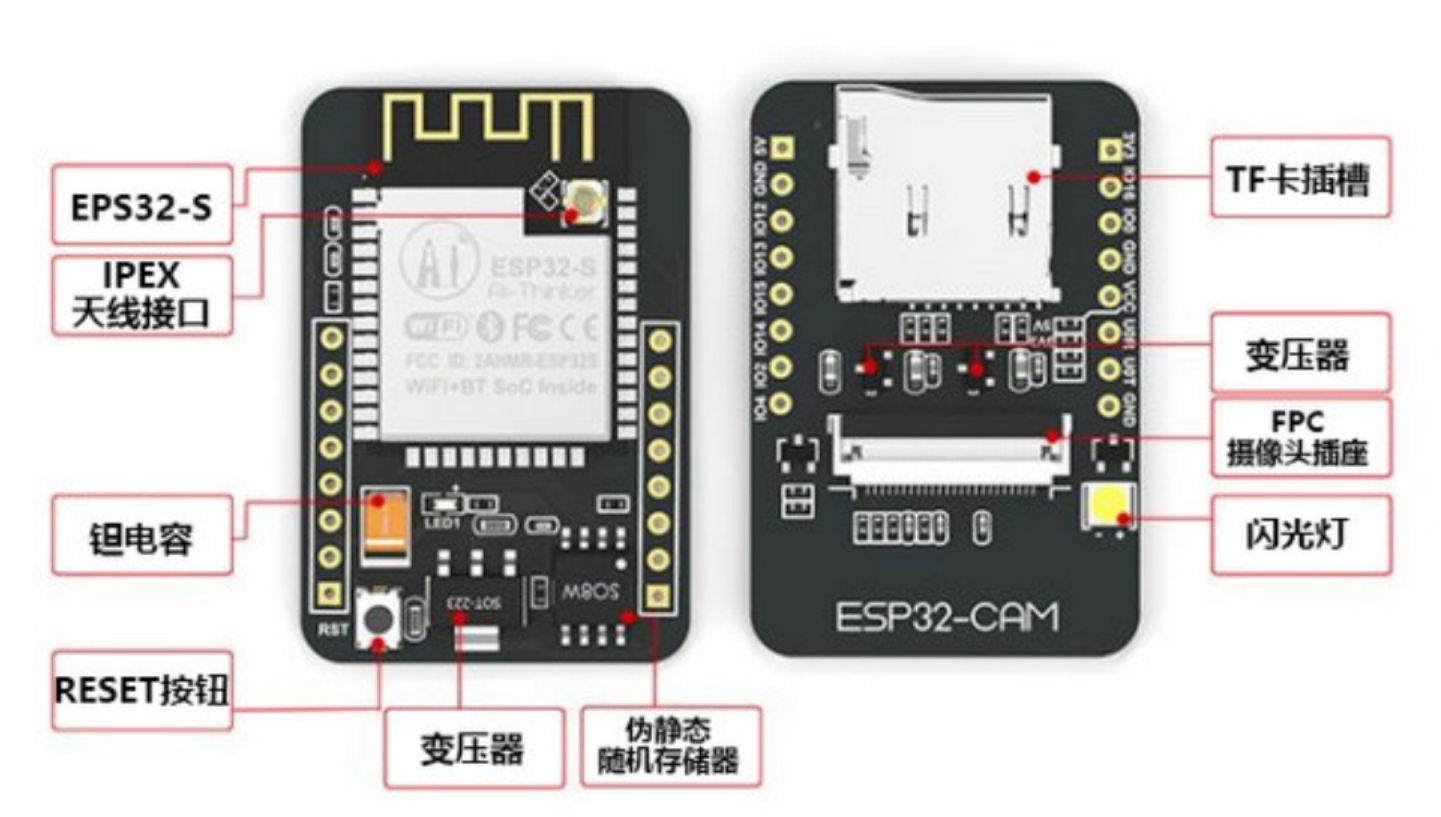
  • 硬件结构

img

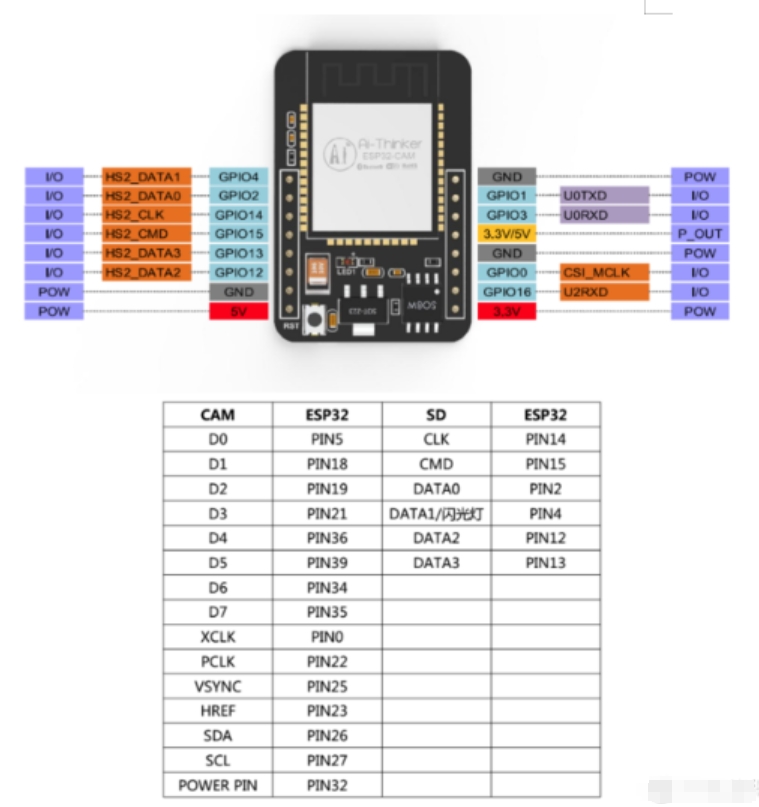
针脚定义

img

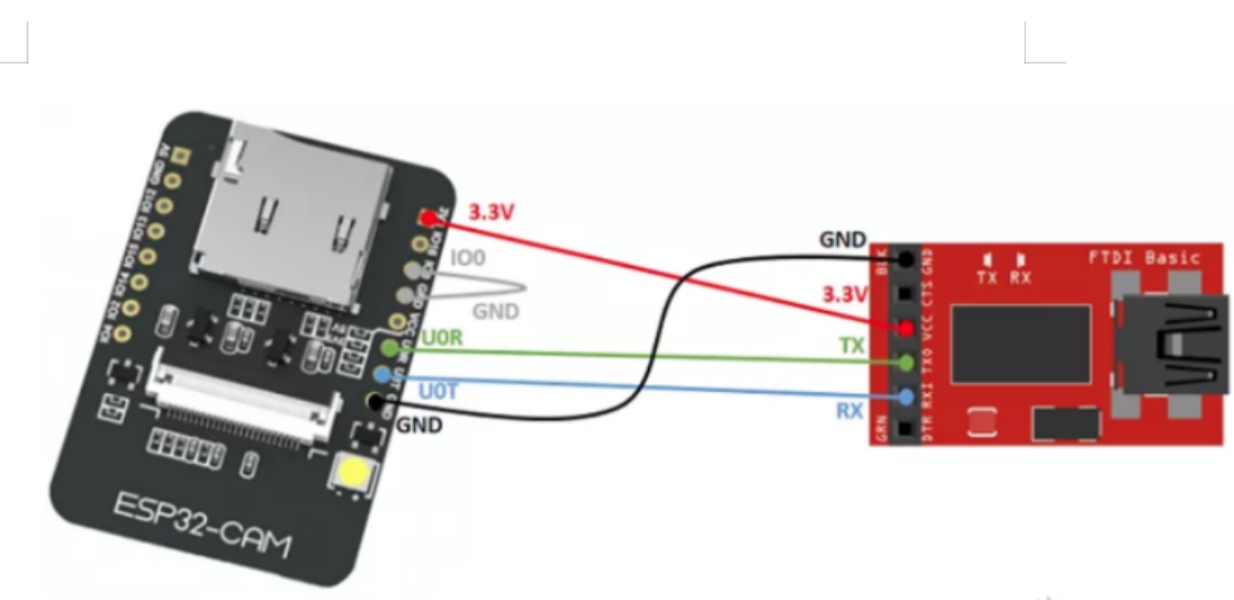
如何烧录程序,使用以下方式

img

  • 最终效果

img

技术

  • esp32

  • http

  • html

  • pyqt5

  • opencv

  • mysql

  • ov2640

  • ardunio IDE and PyCharm IDE

  • 云服务(巴法云)

  • ubuntu

  • other(python第三方库)

程序写入方式

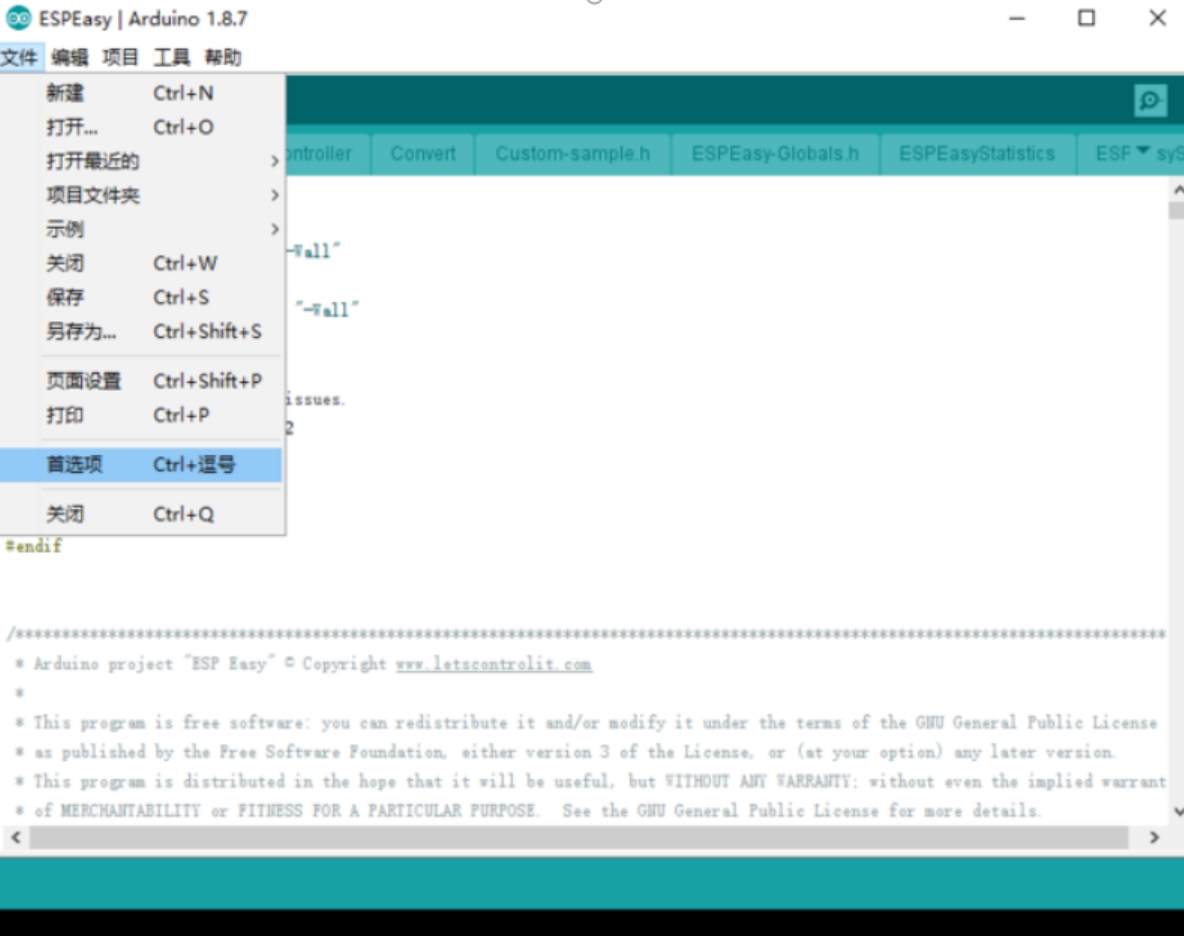
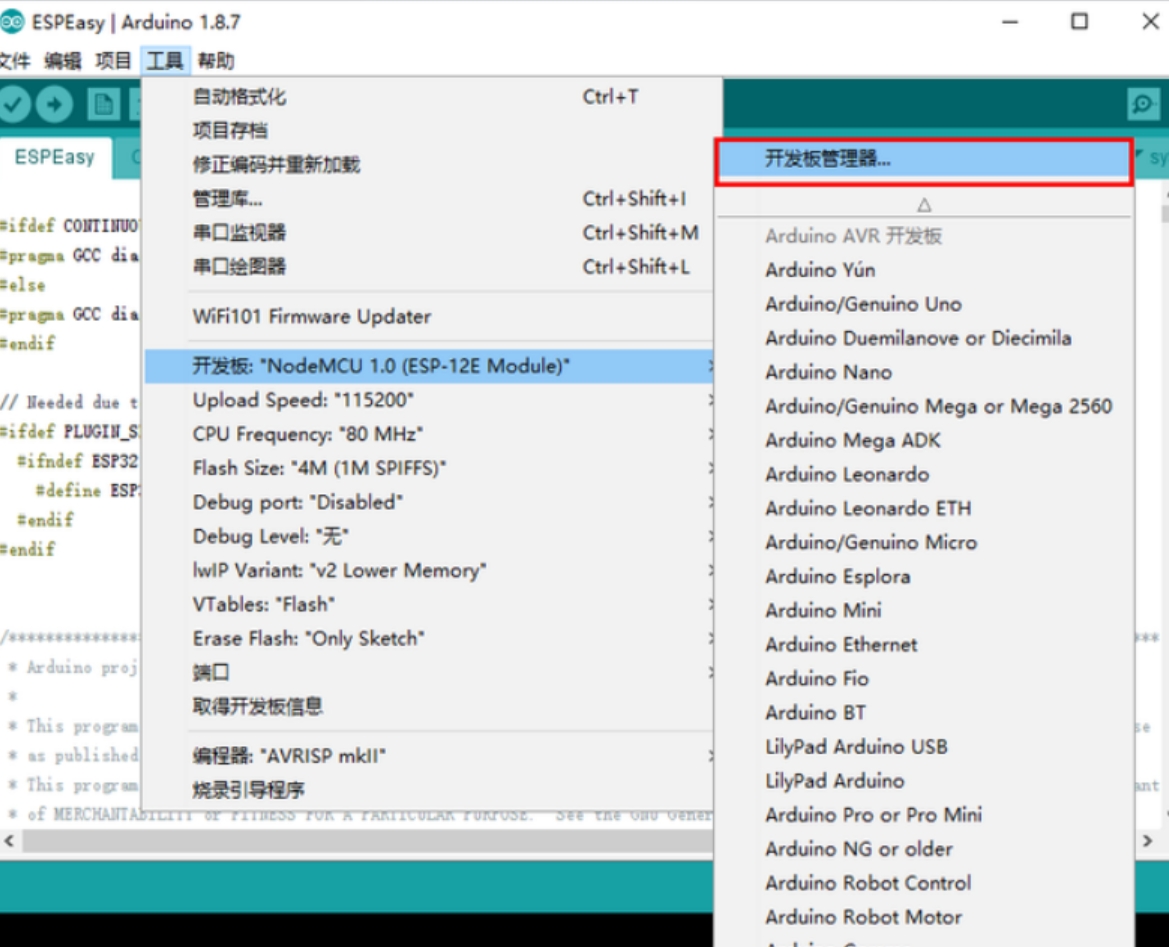
ardunio IDE设置

设置方式如下

img

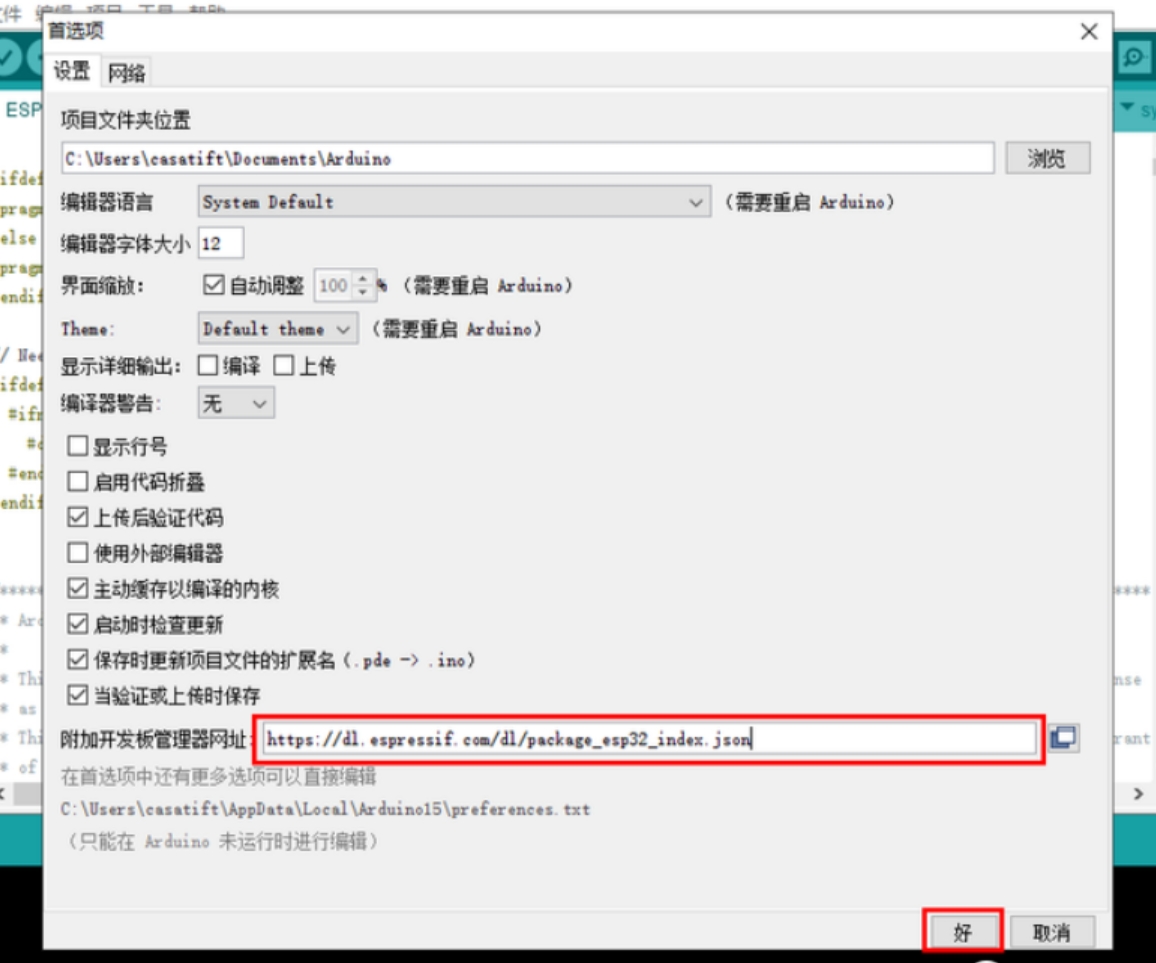
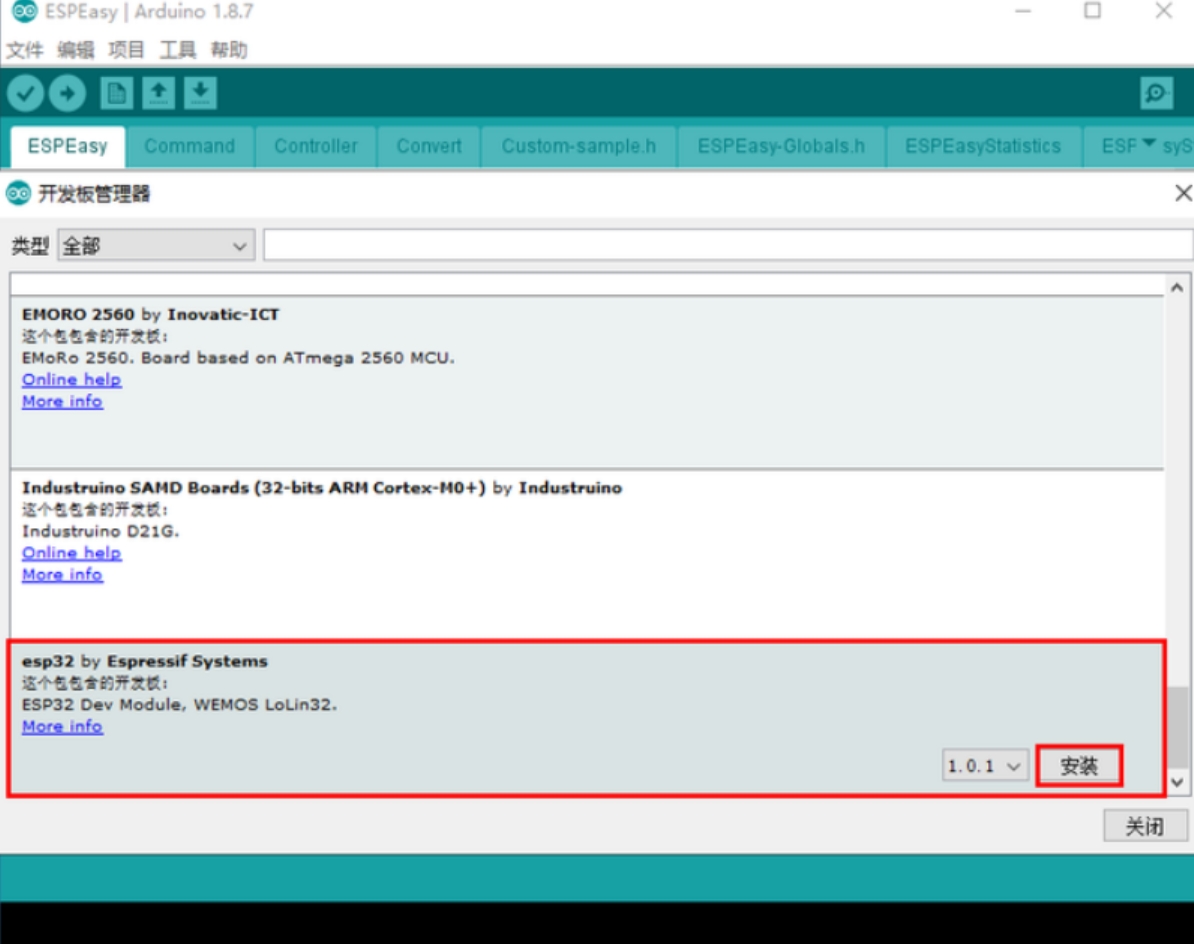
添加芯片驱动支持:在附加开发板管理器网址里填上:https://dl.espressif.com/dl/package_esp32_index.json 然后单击好

img

开发板管理

img

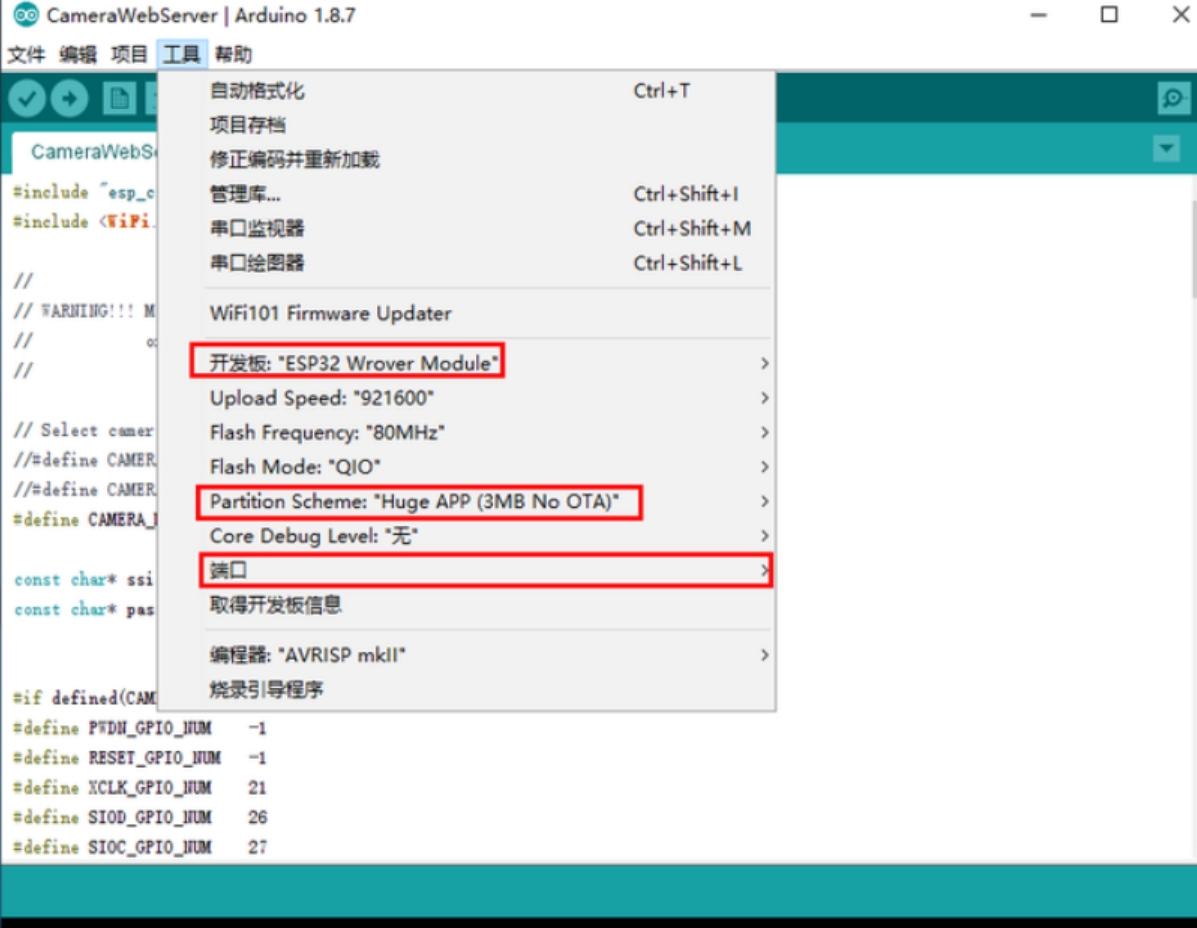
代码下载 (https://github.com/RuiSantosdotme/arduino-esp32-CameraWebServer)

img

基础配置

img

ESP32-CAM 内置接口

接口定义

1
2
3
4
5
6
7
8
9
10
11
12
13
14
15
16
17
18
19
20
21
22
23
24
25
26
27
28
29
30
31
32
33
ip		            端口	后缀	方式	响应		说明		
192.168.2.151 80 /status get { {
/control get     "framesize": 4,     "framesize": 4,
81 /stream get     "quality": 10, 视频流   //  "quality": 10,
/capture get     "brightness": 0, 图像流     "brightness": 0,
/ get     "contrast": 0, 主页     //"contrast": 0, //对比度
    "saturation": 0,  //   "saturation": 0,//饱和度
    "special_effect": 0,     "special_effect": 0,//特殊效果
    "wb_mode": 0, //    "wb_mode": 0,//模式
    "awb": 1,   //  "awb": 1,//自动白平衡
    "awb_gain": 1, //    "awb_gain": 1,//自动白平衡增益
    "aec": 1,  //   "aec": 1,//回声消除
    "aec2": 0,  //   "aec2": 0,//
    "ae_level": 0,  //   "ae_level": 0,//ae 等级
    "aec_value": 168,     "aec_value": 168,//回声消除数值
    "agc": 1,   //  "agc": 1,//自动增益控制
    "agc_gain": 0,  //   "agc_gain": 0,//自动控制增益 增益
    "gainceiling": 0,     "gainceiling": 0,//增益上限
    "bpc": 0,    // "bpc": 0,//贝叶斯预测补偿
    "wpc": 1,    // "wpc": 1,//瓦特脉冲通信
    "raw_gma": 1, //    "raw_gma": 1,//raw生成
    "lenc": 1,   //  "lenc": 1,//镜头校正
    "vflip": 0,   //  "vflip": 0,//垂直旋转
    "hmirror": 0, //    "hmirror": 0,//水平镜像
    "dcw": 1,    // "dcw": 1,//
    "colorbar": 0, //    "colorbar": 0,//色条
    "face_detect": 0,     "face_detect": 0,//人脸注册
    "face_enroll": 1,     "face_enroll": 1,//人脸注册
    "face_recognize": 0     "face_recognize": 0//人脸识别
} }


http接口

1
2
3
4
5
6
7
8
9
10
11
12
13
14
15
16
17
18
19
20
21
22
23
24
25
26
27
28
29
30
31
32
33
34
35
参数	方法	含义	位置	类型	ra							
ra_filter_t 使用的过滤值 37-43 结构体 显色指数
jpg_chunking_t 45-58 结构体
face_id_list 人脸识别列表 63 数组
ra_filter_init ra过滤方法初始化 65 方法
ra_filter_run ra过滤方法运行 78 方法
rgb_print RGB输出 93 方法
rgb_printf RGB格式化输出 103 方法
draw_face_boxes 绘制识别框 128 方法
run_face_recognition 运行脸部识别程序 164 方法
jpg_encode_stream JPG解码 206 方法
capture_handler 绘图线程 218 方法
stream_handler 数据流线程 303 方法
cmd_handler 控制线程 453 方法
status_handler 状态线程 540 方法
index_handler 主页 581 方法
startCameraServer 启动照相机服务 578 方法


1 2 3 4
startCameraServer ra_filter_init face_id_init httpd_register_uri_handler

1 index handler index handler / get

3 status handler status handler /status get esp_camera_sensor_get httpd_resp_send json data

2 cmd handler cmd handler /control get
192.168.2.151

4 capture handler capture handler /capture get

5 stream handler stream handler /stream get face_detect run_face_recognition

程序设计

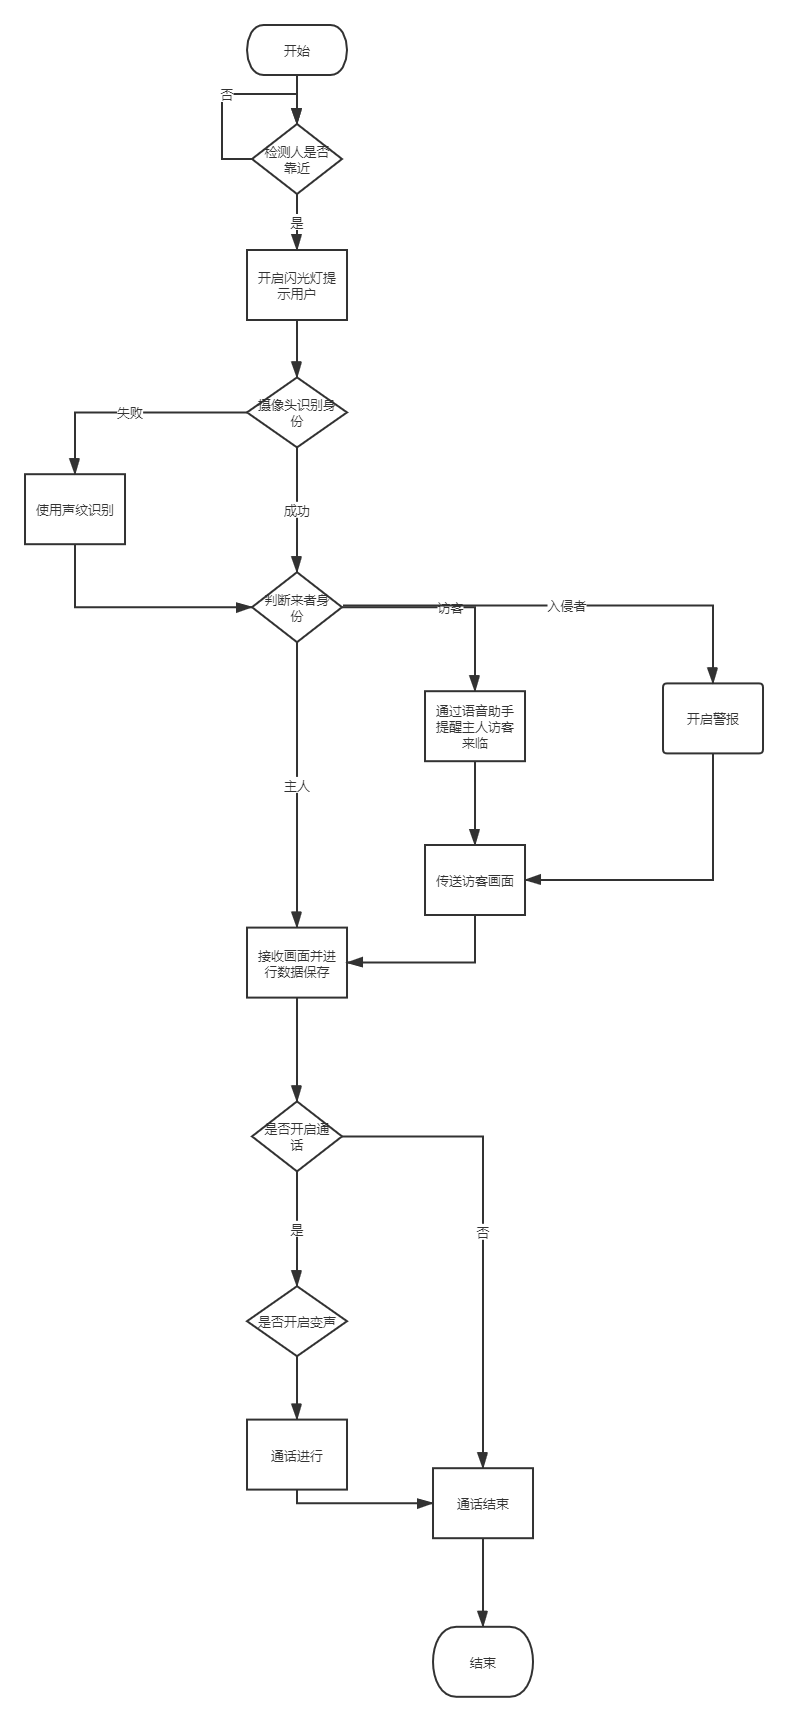
流程设计

功能流程

img

主要功能

1
2
3
4
5
6
7
8
9
10
1.通过语音识别访客身份
2.通过人脸识别访问者
3.通过摄像进行移动侦测
4.入侵者报警
5.录像、拍照数据保存(云存储)
6.访客近距离侦测后亮灯
7.通话变声
8.视频通话
9.WIFI+4G联网
10.连接小度智能助手

功能实现

人脸识别

脸部信息对比

1
2
3
4
5
6
7
8
9
10
11
12
13
14
15
16
17
18
19
20
21
22
23
24
25
26
27
28
29
30
31
32
33
34
35
36
37
38
39
40
41
42
43
44
45
46
47
48
49
50
51
52
53
54
55
56
57
58
59
60
61
62
63
64
65
66
67
68
69
70
71
72
73
74
75
76
77
78
79
80
81
82
83
84
85
86
87
88
89
90
91
92
93
94
95
96
97
98
99
100
101
102
103
104
105
106
107
# # -*- coding:utf-8 -*-
import cv2
import os
import numpy as np


# 检测人脸
def detect_face(img):
#将测试图像转换为灰度图像,因为opencv人脸检测器需要灰度图像
gray = cv2.cvtColor(img, cv2.COLOR_BGR2GRAY)
#加载OpenCV人脸检测分类器Haar
face_cascade = cv2.CascadeClassifier('C:/Users/Administrator/Downloads/opencv-python-4.4.0.40/opencv-python-4.4.0.40/opencv/data/haarcascades_cuda/haarcascade_frontalface_default.xml')
#检测多尺度图像,返回值是一张脸部区域信息的列表(x,y,宽,高)
faces = face_cascade.detectMultiScale(gray, scaleFactor=1.2, minNeighbors=5)
# 如果未检测到面部,则返回原始图像
if (len(faces) == 0):
print('error! 未检测到面部图像')
return None, None
#目前假设只有一张脸,xy为左上角坐标,wh为矩形的宽高
(x, y, w, h) = faces[0]
#返回图像的正面部分
return gray[y:y + w, x:x + h], faces[0]


# 该函数将读取所有的训练图像,从每个图像检测人脸并将返回两个相同大小的列表,分别为脸部信息和标签
def prepare_training_data(data_folder_path):
# 获取数据文件夹中的目录(每个主题的一个目录)
dirs = os.listdir(data_folder_path)
# 两个列表分别保存所有的脸部和标签
faces = []
labels = []
# 浏览每个目录并访问其中的图像
for dir_name in dirs:
# dir_name(str类型)即标签
label = int(dir_name)
# 建立包含当前主题主题图像的目录路径
subject_dir_path = data_folder_path + "/" + dir_name
# 获取给定主题目录内的图像名称
subject_images_names = os.listdir(subject_dir_path)
# 浏览每张图片并检测脸部,然后将脸部信息添加到脸部列表faces[]
for image_name in subject_images_names:
# 建立图像路径
image_path = subject_dir_path + "/" + image_name
# 读取图像
image = cv2.imread(image_path)
# 显示图像0.1s
cv2.imshow("Training on image...", image)
cv2.waitKey(100)
# 检测脸部
face, rect = detect_face(image)
# 我们忽略未检测到的脸部
if face is not None:
#将脸添加到脸部列表并添加相应的标签
faces.append(face)
labels.append(label)
cv2.waitKey(1)
cv2.destroyAllWindows()
#最终返回值为人脸和标签列表
return faces, labels
#调用prepare_training_data()函数
faces, labels = prepare_training_data("training_data")
#创建LBPH识别器并开始训练,当然也可以选择Eigen或者Fisher识别器
face_recognizer = cv2.face.LBPHFaceRecognizer_create()
face_recognizer.train(faces, np.array(labels))
#根据给定的(x,y)坐标和宽度高度在图像上绘制矩形


def draw_rectangle(img, rect):
(x, y, w, h) = rect
cv2.rectangle(img, (x, y), (x + w, y + h), (128, 128, 0), 2)
# 根据给定的(x,y)坐标标识出人名


def draw_text(img, text, x, y):
cv2.putText(img, text, (x, y), cv2.FONT_HERSHEY_COMPLEX, 1, (128, 128, 0), 2)
#建立标签与人名的映射列表(标签只能为整数)
subjects = ["czq", "other"]
# 此函数识别传递的图像中的人物并在检测到的脸部周围绘制一个矩形及其名称
def predict(test_img):
#生成图像的副本,这样就能保留原始图像
img = test_img.copy()
#检测人脸
face, rect = detect_face(img)
#预测人脸
label = predict(face)
# 获取由人脸识别器返回的相应标签的名称
label_text = subjects[label[0]]
# 在检测到的脸部周围画一个矩形
draw_rectangle(img, rect)
# 标出预测的名字
draw_text(img, label_text, rect[0], rect[1] - 5)
#返回预测的图像
return img
#加载测试图像


test_img1 = cv2.imread("../images/face_img/face9.png")
test_img2 = cv2.imread("../images/face_img/face1.png")
#执行预测
predicted_img1 = predict(test_img1)
predicted_img2 = predict(test_img2)
#显示两个图像
cv2.imshow(subjects[0], predicted_img1)
cv2.imshow(subjects[1], predicted_img2)
cv2.waitKey(0)
cv2.destroyAllWindows()

串口数据获取

数据流获取

1
2
3
4
5
6
7
8
9
10
11
12
13
14
15
16
17
18
19
20
21
22
23
24
25
26
27
28
29
30
31
32
33
34
35
36
37
38
39
40
41
42
43
44
45
46
47
48
49
50
51
52
53
54
# -*- coding: utf-8 -*-
# /usr/bin/env/python3
'''use opencv3 to capture video frame, show and save its stream.'''

import cv2


def stream_processing():
# 获取VideoCapture类实例,读取视频文件
fcap = cv2.VideoCapture('http://192.168.1.104:81/stream')

# 设置摄像头分辨率的高
fcap.set(cv2.CAP_PROP_FRAME_HEIGHT, 1080)
# 设置摄像头分辨率的宽
fcap.set(cv2.CAP_PROP_FRAME_WIDTH, 1920)
# 跳到某一感兴趣帧并从此帧开始读取,如从第360帧开始读取
fcap.set(cv2.CAP_PROP_POS_FRAMES, 360)

# 获取视频帧的宽
w = fcap.get(cv2.CAP_PROP_FRAME_WIDTH)
# 获取视频帧的高
h = fcap.get(cv2.CAP_PROP_FRAME_HEIGHT)
# 获取视频帧的帧率
fps = fcap.get(cv2.CAP_PROP_FPS)
# 获取视频流的总帧数
fcount = fcap.get(cv2.CAP_PROP_FRAME_COUNT)

# 获取VideoWriter类实例
writer = cv2.VideoWriter('http://192.168.1.104:81/stream', cv2.VideoWriter_fourcc('X', 'V', 'I', 'D'), int(fps), (int(w), int(h)))

# 判断是否正确获取VideoCapture类实例
while fcap.isOpened():
# 获取帧画面
success, frame = fcap.read()
while success:
cv2.imshow("demo", frame) ## 显示画面
# 获取帧画面
success, frame = fcap.read()

# 保存帧数据
writer.write(frame)

if (cv2.waitKey(20) & 0xff) == ord('q'): ## 等待20ms并判断是按“q”退出,相当于帧率是50hz,注意waitKey只能传入整数,
break
# 释放VideoCapture资源
fcap.release()
# 释放VideoWriter资源
writer.release()
cv2.destroyAllWindows() ## 销毁所有opencv显示窗口


if __name__ == "__main__":
stream_processing()

视频生成c存储

1
2
3
4
5
6
7
8
9
10
11
12
13
14
15
16
17
18
19
20
21
22
23
24
25
26
27
28
29
30
31
32
33
34
35
36
37
38
39
40
41
42
43
44
45
46
47
48
49
50
51
52
53
54
55
56
57
#!/usr/bin/env python
import cv2
from cv2 import VideoWriter, VideoWriter_fourcc, imread, resize
import os
import time
import readSql
import datetime
'''

@theme 视频存储处理
@author czq
@date 2021 01 12

'''


def pic_save_video():
"""
图片转视频
"""
img_root = "E:/czq/personFile/catCamera/src/server/data/video_img/"
# Edit each frame's appearing time! E:\czq\personFile\catCamera\src\server\data\video_img src\server\data\video_img
fps = 5
# fourcc=VideoWriter_fourcc(*"MJPG")
# videoWriter=cv2.VideoWriter("./Vid.avi",fourcc,fps,(720,720))
localtime = datetime.datetime.now()
date = str(localtime.year) + " " + str(localtime.month) + " " + str(localtime.day)
times = str(localtime.hour) + ":" + str(localtime.minute) + ":" + str(localtime.minute)
video_src = 'E:/czq/personFile/catCamera/src/server/data/video/catEye' + date +'.avi'
print(video_src)
videoWriter = cv2.VideoWriter(video_src, cv2.VideoWriter_fourcc('M', 'P', 'E', 'G'), fps, (720, 720))
im_names = os.listdir(img_root)
# for im_name in range(len(im_names)):
for filename in im_names:
# frame=cv2.imread(img_root+str(im_name)+'.jpg')
imgname = "E:/czq/personFile/catCamera/src/server/data/video_img/" + filename
frame = cv2.imread(imgname)
try:
frame = cv2.resize(frame, (720, 720))
cv2.imshow("猫眼视频(catEye video)", frame)
except cv2.error as ce:
print(ce)
print('cv2.error 图片旋转错误')
print(imgname)

time.sleep(0.02)
print('saving video .....')
videoWriter.write(frame)
cv2.waitKey(1)
videoWriter.release()
readSql.catchVideo(video_src, 'catEye01' + date + times, 1000)
print('saving video .....successful ,please close frame')


if __name__ == '__main__':
pic_save_video()

人脸识别

移动侦测

1
2
3
4
5
6
7
8
9
10
11
12
13
14
15
16
17
18
19
20
21
22
23
24
25
26
27
28
29
30
31
32
33
34
35
36
37
38
39
40
41
42
43
44
45
46
47
48
49
50
51
52
53
54
55
56
57
58
59
60
61
62
63
64
65
66
67
68
69
70
71
72
73
74
75
76
77
78
79
80
81
82
83
84
85
86
87
88
89
90
91
92
93
94
95
96
97
98
99
100
101
102
103
104
105
106
107
108
109
110
111
112
113
114
115
116
117
118
119
120
121
122
123
124
125
126
127
128
129
130
131
132
133
134
135
136
137
138
139
140
141
142
143
144
145
146
147
148
149
150
151
152
153
154
155
156
157
158
159
160
161
162
163
164
165
166
167
168
169
170
171
172
173
174
175
176
177
178
179
180
181
182
183
184
185
186
187
188
189
190
191
192
193
194
195
196
197
198
199
200
201
202
203
204
205
206
207
208
209
210
211
212
213
214
215
216
217
218
219
220
221
222
223
224
225
226
227
228
229
230
231
232
233
234
235
236
237
238
239
240
241
242
243
244
245
246
247
248
249
250
251
252
253
254
255
256
257
258
259
260
261
262
263
264
265
266
267
268
269
270
271
272
273
274
275
276
277
278
279
280
281
282
283
284
285
286
287
288
289
290
291
292
293
294
295
296
297
298
299
300
301
302
303
304
305
306
import dlib  # 人脸识别的库dlib
import numpy
import numpy as np # 数据处理的库numpy
import cv2 # 图像处理的库OpenCv
import pandas as pd # 数据处理的库Pandas
import wx
import os
import csv
import datetime
import _thread

import Sub_Client
import readSql
import win32api,win32con

'''

移动侦测
@author czq
@date 2020 12 28

'''
# face recognition model, the object maps human faces into 128D vectors
facerec = dlib.face_recognition_model_v1("model/dlib_face_recognition_resnet_model_v1.dat")

# Dlib 预测器
detector = dlib.get_frontal_face_detector()
predictor = dlib.shape_predictor('model/shape_predictor_68_face_landmarks.dat')

loading = 'icon/loading.png'
pun_fail = 'icon/pun_fail.png'
pun_repeat = 'icon/pun_repeat.png'
pun_success = 'icon/pun_success.png'

path_logcat_csv = "data/logcat.csv"
user_flag = 0


def read_csv_to_recoders():
recodes = []
if os.path.exists(path_logcat_csv):
with open(path_logcat_csv, "r", newline="") as csvfiler:
reader = csv.reader(csvfiler)
for row in reader:
recodes.append(row) # 包括header
else:
with open(path_logcat_csv, "w", newline="") as csvfilew:
writer = csv.writer(csvfilew)
header = ["姓名", "日期", "时间"]
writer.writerow(header)
return recodes
pass


# 计算两个向量间的欧式距离
def return_euclidean_distance(feature_1, feature_2):
"""

:param feature_1: 向量一
:param feature_2: 向量二
:return: diff or same
"""
feature_1 = np.array(feature_1)
feature_2 = np.array(feature_2)
try:
dist = np.sqrt(np.sum(np.square(feature_1 - feature_2)))
if dist > 0.4:
return "diff"
else:
return "same"
print("欧式距离: ", dist)
except numpy.core._exceptions.UFuncTypeError as ne:
print(ne)


# 处理存放所有人脸特征的csv
path_feature_known_csv = "data/feature_all.csv"

# path_features_known_csv= "/media/con/data/code/python/P_dlib_face_reco/data/csvs/features_all.csv"
csv_rd = pd.read_csv(path_feature_known_csv, header=None, encoding='gbk')

# 存储的特征人脸个数
# print(csv_rd.shape)
# (2,129)

# 用来存放所有录入人脸特征的数组
features_known_arr = []

# print("s0",csv_rd.shape[0],"s1",csv_rd.shape[1])
for i in range(csv_rd.shape[0]):
features_someone_arr = []
for j in range(0, len(csv_rd.iloc[i, :])):
features_someone_arr.append(csv_rd.iloc[i, :][j])
# print(features_someone_arr)
features_known_arr.append(features_someone_arr)
print("数据库人脸数:", len(features_known_arr))


# 返回一张图像多张人脸的128D特征 只返回一张人脸
def get_128d_features(img_gray):
"""

:param img_gray: 灰度图
:return: 人脸
"""
dets = detector(img_gray, 1)
shape = predictor(img_gray, dets[0])
face_des = facerec.compute_face_descriptor(img_gray, shape)
return face_des


class PunchcardUi(wx.Frame):
"""
移动侦测主界面
"""

def __init__(self, superion):
wx.Frame.__init__(self, parent=superion, title="catEye", size=(800, 590),
style=wx.DEFAULT_FRAME_STYLE | wx.STAY_ON_TOP)
self.SetBackgroundColour('white')
self.Center()

self.OpenCapButton = wx.Button(parent=self, pos=(50, 120), size=(90, 60), label='开始检测')

self.resultText = wx.StaticText(parent=self, style=wx.ALIGN_CENTER_VERTICAL, pos=(50, 320), size=(90, 60),
label="未知用户报警")

self.resultText.SetBackgroundColour('white')
self.resultText.SetForegroundColour('blue')
font = wx.Font(14, wx.DECORATIVE, wx.ITALIC, wx.NORMAL)
self.resultText.SetFont(font)

self.pun_day_num = 0

# 封面图片
self.image_loading = wx.Image(loading, wx.BITMAP_TYPE_ANY).Scale(600, 480)

self.image_fail = wx.Image(pun_fail, wx.BITMAP_TYPE_ANY).Scale(600, 480)
self.image_repeat = wx.Image(pun_repeat, wx.BITMAP_TYPE_ANY).Scale(600, 480)
self.image_success = wx.Image(pun_success, wx.BITMAP_TYPE_ANY).Scale(600, 480)

# 显示图片
self.bmp = wx.StaticBitmap(parent=self, pos=(180, 20), bitmap=wx.Bitmap(self.image_loading))

self.Bind(wx.EVT_BUTTON, self.OnOpenCapButtonClicked, self.OpenCapButton)

def OnOpenCapButtonClicked(self, event):

"""使用多线程,子线程运行后台的程序,主线程更新前台的UI,这样不会互相影响"""
# 创建子线程,按钮调用这个方法,
_thread.start_new_thread(self._open_cap, (event,))

def _open_cap(self, event):
# 创建 cv2 摄像头对象
global dets
urlc = 'http://192.168.1.104:81/stream'
localtime = datetime.datetime.now()
date = str(localtime.year) + " " + str(localtime.month) + " " + str(localtime.day)
time = str(localtime.hour) + " " + str(localtime.minute) + " " + str(localtime.minute)
video_src = 'E:/czq/personFile/catCamera/src/server/data/video/catEye' + date + '.avi'

a = 0
self.cap = cv2.VideoCapture(video_src)
# cap.set(propId, value)
# 设置视频参数,propId设置的视频参数,value设置的参数值
self.cap.set(3, 480)

# cap是否初始化成功
while self.cap.isOpened():

# cap.read()
# 返回两个值:
# 一个布尔值true/false,用来判断读取视频是否成功/是否到视频末尾
# 图像对象,图像的三维矩阵
flag, im_rd = self.cap.read()

# 每帧数据延时1ms,延时为0读取的是静态帧
kk = cv2.waitKey(1)
try:
# 人脸数 dets
dets = detector(im_rd, 1)
except TypeError as te:
print(te)
print('人脸数目获取错误!')
# 待会要写的字体
font = cv2.FONT_HERSHEY_SIMPLEX

# 存储人脸名字和位置的两个 list
# list 1 (dets): store the name of faces Jack unknown unknown Mary
# list 2 (pos_namelist): store the positions of faces 12,1 1,21 1,13 31,1

# 人脸的名字
name = ''
pos = ''
# pos_namelist = []
# name_namelist = []
count = 0
if len(dets) != 0:
# 检测到人脸

# 获取当前捕获到的图像的所有人脸的特征,存储到 features_cap_arr
features_cap = ''
try:
shape = predictor(im_rd, dets[0])
except TypeError as te:
print(te)
print('error!')
features_cap = facerec.compute_face_descriptor(im_rd, shape)

# 遍历捕获到的图像中所有的人脸
# 让人名跟随在矩形框的下方
# 确定人名的位置坐标
# 先默认所有人不认识,是 unknown
name = "unrecognized face"

# 每个捕获人脸的名字坐标
pos = tuple([(int)((dets[0].left() + dets[0].right()) / 2) - 50
, dets[0].bottom() + 20])

# 对于某张人脸,遍历所有存储的人脸特征

for i in range(len(features_known_arr)):
# 将某张人脸与存储的所有人脸数据进行比对
self.pun_day_num = 0
compare = return_euclidean_distance(features_cap, features_known_arr[i][0:-1])
if compare == "same": # 找到了相似脸
name = features_known_arr[i][-1]
recoder = []
recoder.append(name)
localtime = datetime.datetime.now()
date = str(localtime.year) + " " + str(localtime.month) + " " + str(localtime.day)+ ' '
time = str(localtime.hour) + " " + str(localtime.minute) + " " + str(localtime.minute)
recoder.append(date)
recoder.append(time)
recoders = read_csv_to_recoders()
filename = 'data/move_test_img/' + name + date + time + ".png"
print(filename)
cv2.imwrite(filename, im_rd)
user_flag = 1 # 已知人脸
print(recoders)
Sub_Client.upload_image(filename, 'faceImgRegister', 'face image register successful')
readSql.move_test_save_data(name, filename, user_flag)

# 绘制矩形框
cv2.rectangle(im_rd, tuple([dets[0].left(), dets[0].top()]), tuple([dets[0].right(), dets[0].bottom()]),
(255, 0, 0), 2)

# 写人脸名字
cv2.putText(im_rd, name, pos, font, 0.8, (255, 0, 255), 1, cv2.LINE_AA)

if name == "unrecognized face":
print("danger\r\n")
import time
import ctypes
player = ctypes.windll.kernel32
player.Beep(1000, 200)
for i in range(10):
time.sleep(1)
player.Beep(1000, 200)
# try:
# wx.MessageBox(message="有人入侵了", caption="可怕的消息")
#win32api.MessageBox(0, "有人入侵了", "warning", win32con.MB_ICONWARNING)
print('wx.MessageBox(message="有人入侵了", caption="可怕的消息")')
# except wx._core.PyNoAppError as wpnae:
# print(wpnae)
# print('未知错误')
# print('')
localtime = datetime.datetime.now()
date = str(localtime.year) + " " + str(localtime.month) + " " + str(localtime.day) + ' '
time = str(localtime.hour) + " " + str(localtime.minute) + " " + str(localtime.minute)
user_flag = 0 # 未知人脸

filename = 'data/move_test_img/' + name + date + time + ".png"
print(filename)
cv2.imwrite(filename, im_rd)
# print(recoders)
Sub_Client.upload_image(filename, 'faceRecognizeImage', 'face recognize successful')
readSql.move_test_save_data(name, filename, user_flag)
# _thread.exit()

cv2.putText(im_rd, "Faces: " + str(len(dets)), (50, 80), font, 1, (255, 0, 0), 1, cv2.LINE_AA)

try:
height, width = im_rd.shape[:2]
image1 = cv2.cvtColor(im_rd, cv2.COLOR_BGR2RGB)
pic = wx.Bitmap.FromBuffer(width, height, image1)
# 显示图片在panel上
'''
bug 001
2020 01 16
'''
self.bmp.SetBitmap(pic)
except AttributeError as ae:
print(ae)
print('人脸图片切割错误')
# pic = None
except cv2.error as ce:
print(ce)
print('图片灰度化错误!')
except RuntimeError as re:
print(re)
print('运行中程序出错')


人脸注册

1
2
3
4
5
6
7
8
9
10
11
12
13
14
15
16
17
18
19
20
21
22
23
24
25
26
27
28
29
30
31
32
33
34
35
36
37
38
39
40
41
42
43
44
45
46
47
48
49
50
51
52
53
54
55
56
57
58
59
60
61
62
63
64
65
66
67
68
69
70
71
72
73
74
75
76
77
78
79
80
81
82
83
84
85
86
87
88
89
90
91
92
93
94
95
96
97
98
99
100
101
102
103
104
105
106
107
108
109
110
111
112
113
114
115
116
117
118
119
120
121
122
123
124
125
126
127
128
129
130
131
132
133
134
135
136
137
138
139
140
141
142
143
144
145
146
147
148
149
150
151
152
153
154
155
156
157
158
159
160
161
162
163
164
165
166
167
168
169
170
171
172
173
174
175
176
177
178
179
180
181
182
183
184
185
186
187
188
189
190
191
192
193
194
195
196
197
198
199
200
201
202
203
204
205
206
207
208
209
210
211
212
213
214
215
216
217
218
219
220
221
222
223
224
225
226
227
228
229
230
231
232
233
234
235
236
237
238
239
240
241
242
243
244
245
246
247
248
249
250
251
252
253
254
255
256
257
258
import datetime

import numpy as np # 数据处理的库 Numpy
import cv2 # 图像处理的库 OpenCv
import os
import shutil
import _thread
import wx
import csv
from importlib import reload
from skimage import io as iio
import face_recognize_punchcard
import readSql
import tkinter
from tkinter import Checkbutton, IntVar
import sys

from src.server.myapp import MainApp
import Sub_Client

'''

@theme 人脸检测
@author czq
@date 2021 01 05

'''
# 创建 cv2 摄像头对象

# 保存
path_make_dir = "data/face_img_database/"

path_feature_all = "data/feature_all.csv"

info = 'icon/info.png'
name = [10]
imgSrc = [10]
sex = [10]
user_id = [10]

# register ui

'''
@:param self
@:param event
按钮单击事件
创建文件夹按钮事件
'''

def OnNewButtonClicked(self, event):
"""
按钮单击事件
:param event: 录入人脸事件
"""

while self.name == '':
self.name = wx.GetTextFromUser(message="请先输入录入者的姓名,用于创建姓名文件夹", caption="温馨提示",
default_value="", parent=None)

# 监测是否重名
for exsit_name in (os.listdir(path_make_dir)):
if self.name == exsit_name:
wx.MessageBox(message="姓名已存在,请重新输入", caption="警告")
self.name = ''
break
os.makedirs(path_make_dir + self.name)
print("新建的人脸文件夹: ", path_make_dir + self.name)
name[0] = self.name
user_id[0] = 1
self.NewButton.Enable(enable=False)
self.ShortCutButton.Enable(enable=True) # 启用截图按钮
"""使用多线程,子线程运行后台的程序,主线程更新前台的UI,这样不会互相影响"""
# 创建子线程,按钮调用这个方法,
_thread.start_new_thread(self._open_cap, (event,))

'''
截图按钮事件
'''

def OnShortCutButtonClicked(self, event):
"""

:param event: 截图事件
"""
self.SaveButton.Enable(True) # 启用保存按钮
if len(self.rects) != 0:
# 计算矩形框大小,保证同步
height = self.rects[0].bottom() - self.rects[0].top()
width = self.rects[0].right() - self.rects[0].left()
self.sc_number += 1
im_blank = np.zeros((height, width, 3), np.uint8)
for ii in range(height):
for jj in range(width):
im_blank[ii][jj] = self.im_rd[self.rects[0].top() + ii][self.rects[0].left() + jj]

cv2.imencode('.jpg', im_blank)[1].tofile(
path_make_dir + self.name + "/img_face_" + str(self.sc_number) + ".jpg") # 正确方法
print("写入本地:", str(path_make_dir + self.name) + "/img_face_" + str(self.sc_number) + ".jpg")
imgSrc[0] = str(path_make_dir + self.name) + "/img_face_" + str(self.sc_number) + ".jpg"
# readSql.saveData(name, imgSrc, user_id, sex)
Sub_Client.upload_image(imgSrc[0], 'faceImgRegister', 'face image register successful')
readSql.saveUserData(name, sex)
readSql.save_face_table(name, imgSrc[0])
readSql.save_img_data(name, imgSrc[0])

else:
print("未检测到人脸,识别无效,未写入本地")

'''
保存图片按钮事件
'''

def OnSaveButtonClicked(self, event):
"""

:param event: 保存按钮事件
"""
self.bmp.SetBitmap(wx.Bitmap(self.image_info))
self.NewButton.Enable(True) # 启用新建人脸事件
self.SaveButton.Enable(False)
self.ShortCutButton.Enable(False)

# 释放摄像头
self.cap.release()
# 删除建立的窗口
# cv2.destroyAllWindows()

if self.register_flag == 1:
if os.path.exists(path_make_dir + self.name):
shutil.rmtree(path_make_dir + self.name)
print("重复录入,已删除姓名文件夹", path_make_dir + self.name)

if self.sc_number == 0 and len(self.name) > 0:
if os.path.exists(path_make_dir + self.name):
shutil.rmtree(path_make_dir + self.name)
print("您未保存截图,已删除姓名文件夹", path_make_dir + self.name)
if self.register_flag == 0 and self.sc_number != 0:
pics = os.listdir(path_make_dir + self.name)
feature_list = []
feature_average = []
for i in range(len(pics)):
pic_path = path_make_dir + self.name + "/" + pics[i]
print("正在读的人脸图像:", pic_path)
img = iio.imread(pic_path)
img_gray = cv2.cvtColor(img, cv2.COLOR_BGR2RGB)
dets = face_recognize_punchcard.detector(img_gray, 1)
if len(dets) != 0:
shape = face_recognize_punchcard.predictor(img_gray, dets[0])
face_descriptor = face_recognize_punchcard.facerec.compute_face_descriptor(img_gray, shape)
feature_list.append(face_descriptor)
else:
face_descriptor = 0
print("未在照片中识别到人脸")
if len(feature_list) > 0:
for j in range(128):
feature_average.append(0)
for i in range(len(feature_list)):
feature_average[j] += feature_list[i][j]
feature_average[j] = (feature_average[j]) / len(feature_list)
feature_average.append(self.name)

with open(path_feature_all, "a+", newline="") as csvfile:
writer = csv.writer(csvfile)
print('写入一条特征人脸入库', feature_average)
writer.writerow(feature_average)

self.name = ""
self.register_flag = 0
self.sc_number = 0

'''
打开摄像头
'''

def _open_cap(self, event):
# reload(facerec)
reload(face_recognize_punchcard)
# reload(predictor)
# reload(detector)
# reload(return_euclidean_distance())

urlc = 'http://192.168.1.104:81/stream'
a = 0
localtime = datetime.datetime.now()
date = str(localtime.year) + " " + str(localtime.month) + " " + str(localtime.day)
video_src = 'E:/czq/personFile/catCamera/src/server/data/video/catEye' + date + '.avi'
self.cap = cv2.VideoCapture(video_src)

# cap.set(propId, value)
# 设置视频参数,propId 设置的视频参数,value 设置的参数值
self.cap.set(3, 480)
# self.cap.set(cv2.CAP_PROP_FPS,5)
while self.cap.isOpened():
# cap.read()
# 返回两个值:
# 一个布尔值 true/false,用来判断读取视频是否成功/是否到视频末尾
# 图像对象,图像的三维矩阵q
flag, self.im_rd = self.cap.read()
try:
# 人脸数 rects
self.rects = face_recognize_punchcard.detector(self.im_rd, 1)
except TypeError as te:
print(te)
print('人脸未识别到 人脸识别失败!')

cv2.waitKey(1) # 必不可少
# 待会要写的字体
font = cv2.FONT_HERSHEY_SIMPLEX

if len(self.rects) != 0:
# 检测到人脸
# 矩形框#d是人脸

# 查重
features_cap = face_recognize_punchcard.facerec.compute_face_descriptor(self.im_rd,
face_recognize_punchcard.predictor(
self.im_rd, self.rects[0]))
for i in range(len(face_recognize_punchcard.features_known_arr)):
# 将某张人脸与存储的所有人脸数据进行比对
compare = face_recognize_punchcard.return_euclidean_distance(features_cap,
face_recognize_punchcard.features_known_arr[
i][0:-1])
if compare == "same": # 找到了相似脸
face_name = face_recognize_punchcard.features_known_arr[i][-1]
print(face_name)
wx.MessageBox(message=face_name + ",您已录过人脸,清截图保存下一个人物", caption="警告")
self.NewButton.Enable(False)
self.ShortCutButton.Enable(False)
self.SaveButton.Enable(True)
self.register_flag = 1

for k, d in enumerate(self.rects):
# 根据人脸大小生成空的图像
# 最后一个参数是线宽
cv2.rectangle(self.im_rd, tuple([d.left(), d.top()]), tuple([d.right(), d.bottom()]), (255, 0, 0),
2)

# 显示人脸数
cv2.putText(self.im_rd, "Faces: " + str(len(self.rects)), (50, 80), font, 0.8, (255, 0, 0), 1, cv2.LINE_AA)
cv2.putText(self.im_rd, "Warning: please shortcut having rectangle", (50, 140), font, 0.8, (0, 0, 255), 1,
cv2.LINE_AA)

# print(im_rd.shape)
try:
height, width = self.im_rd.shape[:2]
except AttributeError as ae:
print(ae)
print('人脸照片切割错误!')
image1 = cv2.cvtColor(self.im_rd, cv2.COLOR_BGR2RGB)
pic = wx.Bitmap.FromBuffer(width, height, image1)
# 显示图片在panel上
self.bmp.SetBitmap(pic)

# 直接在sbclicked里设置self.bmp.SetBitmap(wx.Bitmap(self.image_cover)),子线程还在运行
if self.NewButton.IsEnabled() == True and self.ShortCutButton.IsEnabled() == False and self.SaveButton.IsEnabled() == False:
self.bmp.SetBitmap(wx.Bitmap(self.image_info))
_thread.exit()

相机截图

1
2
3
4
5
6
7
8
9
10
11
12
13
14
15
16
17
18
19
20
21
22
23
24
25
26
27
28
29
30
31
32
33
34
35
36
37
38
39
40
41
42
43
44
45
46
47
import cv2

def getTrainingData(window_name, camera_id, path_name, max_num): # path_name是图片存储目录,max_num是需要捕捉的图片数量
cv2.namedWindow(window_name) # 创建窗口
cap = cv2.VideoCapture(camera_id) # 打开摄像头
classifier = cv2.CascadeClassifier('haarcascade_frontalface_alt2.xml') # 加载分类器
color = (0,255,0) # 人脸矩形框的颜色
num = 0 # 记录存储的图片数量

while cap.isOpened():
ok, frame = cap.read()
if not ok:
break

gray = cv2.cvtColor(frame, cv2.COLOR_BGR2GRAY) # 灰度化
faceRects=classifier.detectMultiScale(gray,scaleFactor=1.2,minNeighbors=3,minSize=(32,32))

if len(faceRects) > 0:
for faceRect in faceRects:
x,y,w,h = faceRect
# 捕捉到的图片的名字,这里用到了格式化字符串的输出
image_name = '%s%d.jpg' % (path_name, num) # 注意这里图片名一定要加上扩展名,否则后面imwrite的时候会报错:could not find a writer for the specified extension in function cv::imwrite_ 参考:https://stackoverflow.com/questions/9868963/cvimwrite-could-not-find-a-writer-for-the-specified-extension
image = frame[y:y+h, x:x+w] # 将当前帧含人脸部分保存为图片,注意这里存的还是彩色图片,前面检测时灰度化是为了降低计算量;这里访问的是从y位开始到y+h-1位
cv2.imwrite(image_name, image)

num += 1
# 超过指定最大保存数量则退出循环
if num > max_num:
break

cv2.rectangle(frame, (x,y), (x+w,y+h), color, 2) # 画出矩形框
font = cv2.FONT_HERSHEY_SIMPLEX # 获取内置字体
cv2.putText(frame, ('%d'%num), (x+30, y+30), font, 1, (255,0,255), 4) # 调用函数,对人脸坐标位置,添加一个(x+30,y+30)的矩形框用于显示当前捕捉到了多少人脸图片
if num > max_num:
break
cv2.imshow(window_name, frame)
c = cv2.waitKey(10)
if c & 0xFF == ord('q'):
break

cap.release()#释放摄像头并销毁所有窗口
cv2.destroyAllWindows()
print('Finished.')
#主函数
if __name__ =='__main__':
print ('catching your face and writting into disk...')
getTrainingData('getTrainData',0,'training_data_me/',100) # 注意这里的training_data_xx 文件夹就在程序工作目录下

视频数据接受(socket client)

1
2
3
4
5
6
7
8
9
10
11
12
13
14
15
16
17
18
19
20
21
22
23
24
25
26
27
28
29
30
31
32
33
34
35
36
37
38
39
40
41
42
43
44
45
46
47
48
49
50
51
52

import cv2
import numpy as np
import socket

usoc = socket.socket(socket.AF_INET, socket.SOCK_DGRAM) # 建一个UDP socket
usoc.bind(('', 10000)) # 监听端口号
print("Start!")
frameIdNow = 0 # 当前帧帧号
frameSizeNow = 0 # 当前接收到的帧体积
packetIdNow = 0 # 最新已接收的数据包号
packetCount = 0 # 当前帧包的数量
packetLen = 0 # 标准数据包大小
frameSizeOk = 0 # 当前帧已接收数据量
jpgBuff = bytes('ix', 'utf-8') # 图片数据缓存
print(usoc)

while True:
udpbuff, address = usoc.recvfrom(10240) # 阻塞接收数据,最多一次接收10240字节
print(address)
print(udpbuff)
# 解析数据
frameId = (udpbuff[1] << 24) + (udpbuff[2] << 16) + (udpbuff[3] << 8) + udpbuff[4] # 获取帧号
frameSize = (udpbuff[5] << 24) + (udpbuff[6] << 16) + (udpbuff[7] << 8) + udpbuff[8] # 获取帧体积
packetId = udpbuff[10] # 获取包号
packetSize = (udpbuff[13] << 8) + udpbuff[14] # 获取包体积

if frameIdNow != frameId: # 换帧,记录新一帧的数据信息
frameIdNow = frameId # 更新帧号
frameSizeNow = frameSize # 更新帧体积
packetCount = udpbuff[9] # 更新数据包数量
packetLen = (udpbuff[11] << 8) + udpbuff[12] # 更新数据包长度
frameSizeOk = 0 # 清除当前帧已接收数据量
packetIdNow = 0 # 最新已接收数据包号清零
jpgBuff = bytes('', 'utf-8') # 清空图片数据缓存

# 复制至缓冲区,并只接收安全范围内的数据包
if (packetId <= packetCount) and (packetId > packetIdNow): # 新数据包包号不超过总数据包数量,且包号刚好比前一包多1
if packetSize == (len(udpbuff) - 15): # 数据包减去包头等于包体积
if (packetSize == packetLen) or (packetId == packetCount): # 标准包或最后一包
jpgBuff = jpgBuff + udpbuff[15:] # 拼接数据包
frameSizeOk = frameSizeOk + len(udpbuff) - 15 # 帧数据总量累加

if frameSizeNow == frameSizeOk: # 当前帧接收完成
nparr = np.frombuffer(jpgBuff, dtype=np.uint8) # 将图片数组转为numpy数组
image = cv2.imdecode(nparr, cv2.IMREAD_COLOR) # 解码图片
cv2.imshow('ESP', image) # 将图片显示出来
if cv2.waitKey(1) == 27: # 按下ESC键退出
break;

usoc.close()

其他API调用

1
2
3
4
5
6
7
8
9
10
11
12
13
14
15
16
17
18
19
20
21
22
23
24
25
26
27
28
29
30
31
32
33
34
35
36
37
38
39
40
41
42
43
44
45
46
47
48
49
50
51
52
53
54
55
56
57
58
59
60
61
62
63
64
65
66
67
68
69
70
71
72
73
74
75
76
77
78
79
80
81
82
83
84
85
86
87
88
89
90
91
92
93
94
95
96
97
98
99
100
101
102
103
104
105
106
107
108
109
110
111
112
113
114
115
116
117
118
119
120
121
122
123
124
125
126
127
128
129
130
131
132
133
134
135
136
137
138
139
140
141
142
143
144
145
146
147
148
149
150
151
152
153
154
155
156
157
158
159
160
161
162
163
164
165
166
167
168
169
170
171
172
173
174
175
176
177
178
179
180
181
182
183
184
185
186
187
188
189
190
191
192
193
194
195
196
197
198
199
200
201
202
203
204
205
206
207
208
209
210
211
212
213
'''
@author czq
@date 2020 12 23
'''

# encoding:utf-8
from cv2 import *
import cv2 as cv
import dlib # 人脸识别的库dlib
import requests as re
import json

img_src = 'http://192.168.2.151/capture'
video_src = 'http://192.168.2.151:81/stream'
CAM_SRC = 'http://192.168.2.151'


##############
# opencv #
# loadimg #
##############
# opencv不能直接从网络获取图片,但是opencv的VideoCapture类可以从url加载视频
def loadImg():
cap = VideoCapture(img_src)
if (cap.isOpened()):
ret, img = cap.read()
img = resize(img, (800, 600))
imshow("image", img)
print('load image successful', img)
waitKey(10)
cv.destroyAllWindows()
# img = cv.imread(img_src,cv.IMREAD_COLOR )
print(img)
for i in range(100):
cv.imwrite('./images/face_img/face' + str(i) + '.png', img)


##############
# opencv #
# saveimg #
##############
# 保存所获取的图片

def saveImg():
cap = VideoCapture(img_src)
if cap.isOpened():
ret, img = cap.read()
sav_img = resize(img, (800, 600))
height = 800
width = 600
top = 10
left = 10
cv.destroyAllWindows()
# img = cv.imread(img_src,cv.IMREAD_COLOR )
print(sav_img)
cv.imwrite('./images/face_img/face.png', sav_img)


def loadVideo():
cap = VideoCapture(video_src)
if cap.isOpened():
ret, img = cap.read()
img = resize(img, (800, 600))
imshow("image", img)
print('load image successful')
waitKey(0)


'''
@methods

call face recognized api
@return null

'''


def call_face_api():
r = re.get('http://192.168.2.151/status')
print(r)
print(r.status_code)
print(r.text)
user_dic = json.loads(r.text)
face_detect = user_dic['face_detect']
face_enroll = user_dic['face_enroll']
# r = re.get('http://192.168.2.151/control?var=face_detect&val=1')
if face_enroll == 1:
print('人脸注册开始!')
if face_detect == 1:
print('人脸已注册!')
saveImg()
else:
print('还未注册人脸!')
else:
print('请点击 enroll 开始人脸注册!')
face_recognize = user_dic['face_recognize']
if face_recognize == 1:
print('人脸识别开始')
else:
print('点击face_recognize开始人脸识别')

return 1


# -*- coding: utf-8 -*-

import cv2
import sys
from PIL import Image


def CatchUsbVideo(window_name, camera_idx):
cv2.namedWindow(window_name)

# 视频来源,可以来自一段已存好的视频,也可以直接来自USB摄像头
cap = cv2.VideoCapture(camera_idx)

while cap.isOpened():
ok, frame = cap.read() # 读取一帧数据
if not ok:
break

# 显示图像并等待10毫秒按键输入,输入‘q’退出程序
cv2.imshow(window_name, frame)
c = cv2.waitKey(100)
if c & 0xFF == ord('q'):
break

# 释放摄像头并销毁所有窗口
cap.release()
cv2.destroyAllWindows()


def load_face_remove(cam):
# 使用特征提取器get_frontal_face_detector
detector = dlib.get_frontal_face_detector()
# 读入视频文件
# cap = cv2.VideoCapture("row.MP4")
# 建cv2摄像头对象,这里使用电脑自带摄像头,如果接了外部摄像头,则自动切换到外部摄像头

cap = cv2.VideoCapture(cam)

# 设置视频参数,propId设置的视频参数,value设置的参数值
cap.set(3, 480)
# 截图screenshoot的计数器
cnt = 0
# 返回true/false 检查初始化是否成功
while (True):

# cap.read()
# 返回两个值:
# 一个布尔值true/false,用来判断读取视频是否成功/是否到视频末尾
# 图像对象,图像的三维矩阵
flag, im_rd = cap.read()

# 每帧数据延时1ms,延时为0读取的是静态帧
cv2.waitKey(1)

# 取灰度
img_gray = cv2.cvtColor(im_rd, cv2.COLOR_RGB2GRAY)

# 使用人脸检测器检测每一帧图像中的人脸。并返回人脸数rects
faces = detector(img_gray, 0)

# 待会要显示在屏幕上的字体
font = cv2.FONT_HERSHEY_SIMPLEX

# 如果检测到人脸
if (len(faces) != 0):

# 对每个人脸都画出框框
for i in range(len(faces)):
# enumerate方法同时返回数据对象的索引和数据,k为索引,d为faces中的对象
for k, d in enumerate(faces):
# 用红色矩形框出人脸
cv2.rectangle(im_rd, (d.left(), d.top()), (d.right(), d.bottom()), (0, 255, 0), 2)
# 计算人脸热别框边长
face_width = d.right() - d.left()
# 在上方显示文字
cv2.putText(im_rd, str(face_width), (d.left(), d.top() - 20), font, 0.5, (255, 0, 0), 1)
# 标出人脸数
cv2.putText(im_rd, "Faces: " + str(len(faces)), (20, 50), font, 1, (0, 0, 255), 1, cv2.LINE_AA)
else:
# 没有检测到人脸
cv2.putText(im_rd, "No Face", (20, 50), font, 1, (0, 0, 255), 1, cv2.LINE_AA)

# 添加说明
im_rd = cv2.putText(im_rd, "S: screenshot", (20, 400), font, 0.8, (0, 0, 255), 1, cv2.LINE_AA)
im_rd = cv2.putText(im_rd, "Q: quit", (20, 450), font, 0.8, (0, 0, 255), 1, cv2.LINE_AA)

# 检测按键
k = cv2.waitKey(1)
# 按下s键截图保存
if (k == ord('s')):
cnt += 1
cv2.imwrite("screenshoot" + str(cnt) + ".jpg", im_rd)
# 按下q键退出
if (k == ord('q')):
break

# 窗口显示
cv2.imshow("camera", im_rd)

# 释放摄像头
cap.release()
# 删除建立的窗口
cv2.destroyAllWindows()


if __name__ == '__main__':
# cam = urllib2.urlopen(video_src).read()
load_face_remove(video_src)

ESP-CAM 程序功能实现

相机数据转发

http服务器服务端

web服务端建立

1
2
3
4
5
6
7
8
9
10
11
12
13
14
15
16
17
18
19
20
21
22
23
24
25
26
27
28
29
30
31
32
33

void setup() {
Serial.begin(115200);
Serial.setDebugOutput(true);
Serial.println();

//drop down frame size for higher initial frame rate
sensor_t * s = esp_camera_sensor_get();
s->set_framesize(s, FRAMESIZE_QVGA);

WiFi.begin(ssid, password);

//ov2640.initialize();


while (WiFi.status() != WL_CONNECTED) {
delay(500);
Serial.print(".");
}
Serial.println("");
Serial.println("WiFi connected");
internet_connected = true;

startCameraServer();
// ov2640.startCameraServer();
Serial.print("Camera Ready! Use 'http://");
Serial.print(WiFi.localIP());
Serial.println("' to connect");
// server.begin();


}

图片数据抓取

将图片数据推送至指定服务器,可推送至微信公众号

1
2
3
4
5
6
7
8
9
10
11
12
13
14
15
16
17
18
19
20
21
22
23
24
25
26
27
28
29
30
31
32
33
34
35
36
37
38
39
40
41
42
43
44
45
46
47
48
49
50
51
52
53
54
55
56
57
58
59
60
61
62
63
64
65
#define CAMERA_MODEL_AI_THINKER

const char* ssid = "TP-LINK_3551";
const char* password = "H2503...";

WiFiServer server(81);

// // OV2640 camera
// Camera ov2640;

//WIFI名称
//WIFI密码
int capture_interval = 20 * 1000; // 默认20秒上传一次,可更改(本项目是自动上传,如需条件触发上传,在需要上传的时候,调用take_send_photo()即可)
const char* post_url = "http://images.bemfa.com/upload/v1/upimages.php"; // 默认上传地址
const char* uid = "dbd6e715ad7ef039488b390a898a4221"; //用户私钥,巴法云控制台获取
const char* topic = "mypicture"; //主题名字,可在控制台新建
bool sentWechat = true; //是否推送到微信,默认不推送,true 为推送。需要在控制台先绑定微信,不然推送不到
const char* wechatMsg = "自定义消息 查看图片"; //推送到微信的消息,可随意修改,修改为自己需要发送的消息


/********推送图片*********/
static esp_err_t take_send_photo()
{
//初始化相机并拍照
Serial.println("Taking picture...");
camera_fb_t * fb = NULL;
fb = esp_camera_fb_get();
if (!fb) {
Serial.println("Camera capture failed");
return ESP_FAIL;
}

HTTPClient http;
//设置请求url
http.begin(post_url);

//设置 http 请求头部信息
http.addHeader("Content-Type", "image/jpg"); //设置传输类型为图片
http.addHeader("Authorization", uid); //设置用户UID私钥
http.addHeader("Authtopic", topic); //设置主题名称
if (sentWechat) { //判断是否需要推送到微信
http.addHeader("Wechatmsg", wechatMsg); //设置 http 请求头部信息
}


//发起请求,并获取状态码
int httpResponseCode = http.POST((uint8_t *)fb->buf, fb->len);

if (httpResponseCode == 200) {
String response = http.getString(); //Get the response to the request
Serial.println(response); //Print request answer
} else {
Serial.print("Error on sending POST: ");
Serial.println(httpResponseCode);
}

Serial.print("HTTP Response code: ");
Serial.println(httpResponseCode);

//清空数据
esp_camera_fb_return(fb);
//回收下次再用
http.end();

}

人脸识别

1
2
3
4
5
6
7
8
9
10
11
12
13
14
15
16
17
18
19
20
21
22
23
24
25
26
27
28
29
30
31
32
33
34
35
36
37
38
39
40
41
42
43

static int run_face_recognition(dl_matrix3du_t *image_matrix, box_array_t *net_boxes){
dl_matrix3du_t *aligned_face = NULL;
int matched_id = 0;

aligned_face = dl_matrix3du_alloc(1, FACE_WIDTH, FACE_HEIGHT, 3);
if(!aligned_face){
Serial.println("Could not allocate face recognition buffer");
return matched_id;
}
if (align_face(net_boxes, image_matrix, aligned_face) == ESP_OK){
if (is_enrolling == 1){
int8_t left_sample_face = enroll_face(&id_list, aligned_face);

if(left_sample_face == (ENROLL_CONFIRM_TIMES - 1)){
Serial.printf("Enrolling Face ID: %d\n", id_list.tail);
}
Serial.printf("Enrolling Face ID: %d sample %d\n", id_list.tail, ENROLL_CONFIRM_TIMES - left_sample_face);
rgb_printf(image_matrix, FACE_COLOR_CYAN, "ID[%u] Sample[%u]", id_list.tail, ENROLL_CONFIRM_TIMES - left_sample_face);
if (left_sample_face == 0){
is_enrolling = 0;
Serial.printf("Enrolled Face ID: %d\n", id_list.tail);
}
} else {
matched_id = recognize_face(&id_list, aligned_face);
if (matched_id >= 0) {
Serial.printf("Match Face ID: %u\n", matched_id);
rgb_printf(image_matrix, FACE_COLOR_GREEN, "Hello Subject %u", matched_id);
} else {
Serial.println("No Match Found");
rgb_print(image_matrix, FACE_COLOR_RED, "Intruder Alert!");
matched_id = -1;
}
}
} else {
Serial.println("Face Not Aligned");
//rgb_print(image_matrix, FACE_COLOR_YELLOW, "Human Detected");
}

dl_matrix3du_free(aligned_face);
return matched_id;
}

外部调用接口定义

1
2
3
4
5
6
7
8
9
10
11
12
13
14
15
16
17
18
19
20
21
22
23
24
25
26
27
28
29
30
31
32
33
34
35
36
37
38
39
40
41
42
43
44
45
46
47
48
49
50
51
52
53
54
55
56
57
58
59
60
61
62
63
64
65
66
67
httpd_config_t config = HTTPD_DEFAULT_CONFIG();

httpd_uri_t index_uri = {
.uri = "/",
.method = HTTP_GET,
.handler = index_handler,
.user_ctx = NULL
};

httpd_uri_t status_uri = {
.uri = "/status",
.method = HTTP_GET,
.handler = status_handler,
.user_ctx = NULL
};

httpd_uri_t cmd_uri = {
.uri = "/control",
.method = HTTP_GET,
.handler = cmd_handler,
.user_ctx = NULL
};

httpd_uri_t capture_uri = {
.uri = "/capture",
.method = HTTP_GET,
.handler = capture_handler,
.user_ctx = NULL
};

httpd_uri_t stream_uri = {
.uri = "/stream",
.method = HTTP_GET,
.handler = stream_handler,
.user_ctx = NULL
};


ra_filter_init(&ra_filter, 20);

mtmn_config.min_face = 80;
mtmn_config.pyramid = 0.7;
mtmn_config.p_threshold.score = 0.6;
mtmn_config.p_threshold.nms = 0.7;
mtmn_config.r_threshold.score = 0.7;
mtmn_config.r_threshold.nms = 0.7;
mtmn_config.r_threshold.candidate_number = 4;
mtmn_config.o_threshold.score = 0.7;
mtmn_config.o_threshold.nms = 0.4;
mtmn_config.o_threshold.candidate_number = 1;

face_id_init(&id_list, FACE_ID_SAVE_NUMBER, ENROLL_CONFIRM_TIMES);

Serial.printf("Starting web server on port: '%d'\n", config.server_port);
if (httpd_start(&camera_httpd, &config) == ESP_OK) {
httpd_register_uri_handler(camera_httpd, &index_uri);
httpd_register_uri_handler(camera_httpd, &cmd_uri);
httpd_register_uri_handler(camera_httpd, &status_uri);
httpd_register_uri_handler(camera_httpd, &capture_uri);
}

config.server_port += 1;
config.ctrl_port += 1;
Serial.printf("Starting stream server on port: '%d'\n", config.server_port);
if (httpd_start(&stream_httpd, &config) == ESP_OK) {
httpd_register_uri_handler(stream_httpd, &stream_uri);
}

web界面定义

页面定义与渲染 举例 状态页面

1
2
3
4
5
6
7
8
9
10
11
12
13
14
15
16
17
18
19
20
21
22
23
24
25
26
27
28
29
30
31
32
33
34
35
36
37
38
39
40
41
42
43
44
45
46
47
// 定义
static esp_err_t status_handler(httpd_req_t *req){
static char json_response[1024];

sensor_t * s = esp_camera_sensor_get();
char * p = json_response;
*p++ = '{';

p+=sprintf(p, "\"framesize\":%u,", s->status.framesize);
p+=sprintf(p, "\"quality\":%u,", s->status.quality);
p+=sprintf(p, "\"brightness\":%d,", s->status.brightness);
p+=sprintf(p, "\"contrast\":%d,", s->status.contrast);
p+=sprintf(p, "\"saturation\":%d,", s->status.saturation);
p+=sprintf(p, "\"special_effect\":%u,", s->status.special_effect);
p+=sprintf(p, "\"wb_mode\":%u,", s->status.wb_mode);
p+=sprintf(p, "\"awb\":%u,", s->status.awb);
p+=sprintf(p, "\"awb_gain\":%u,", s->status.awb_gain);
p+=sprintf(p, "\"aec\":%u,", s->status.aec);
p+=sprintf(p, "\"aec2\":%u,", s->status.aec2);
p+=sprintf(p, "\"ae_level\":%d,", s->status.ae_level);
p+=sprintf(p, "\"aec_value\":%u,", s->status.aec_value);
p+=sprintf(p, "\"agc\":%u,", s->status.agc);
p+=sprintf(p, "\"agc_gain\":%u,", s->status.agc_gain);
p+=sprintf(p, "\"gainceiling\":%u,", s->status.gainceiling);
p+=sprintf(p, "\"bpc\":%u,", s->status.bpc);
p+=sprintf(p, "\"wpc\":%u,", s->status.wpc);
p+=sprintf(p, "\"raw_gma\":%u,", s->status.raw_gma);
p+=sprintf(p, "\"lenc\":%u,", s->status.lenc);
p+=sprintf(p, "\"vflip\":%u,", s->status.vflip);
p+=sprintf(p, "\"hmirror\":%u,", s->status.hmirror);
p+=sprintf(p, "\"dcw\":%u,", s->status.dcw);
p+=sprintf(p, "\"colorbar\":%u,", s->status.colorbar);
p+=sprintf(p, "\"face_detect\":%u,", detection_enabled);
p+=sprintf(p, "\"face_enroll\":%u,", is_enrolling);
p+=sprintf(p, "\"face_recognize\":%u", recognition_enabled);
*p++ = '}';
*p++ = 0;
httpd_resp_set_type(req, "application/json");
httpd_resp_set_hdr(req, "Access-Control-Allow-Origin", "*");
return httpd_resp_send(req, json_response, strlen(json_response));
}
// 渲染
static esp_err_t index_handler(httpd_req_t *req){
httpd_resp_set_type(req, "text/html");
httpd_resp_set_hdr(req, "Content-Encoding", "gzip");
return httpd_resp_send(req, (const char *)index_html_gz, index_html_gz_len);
}

最终效果

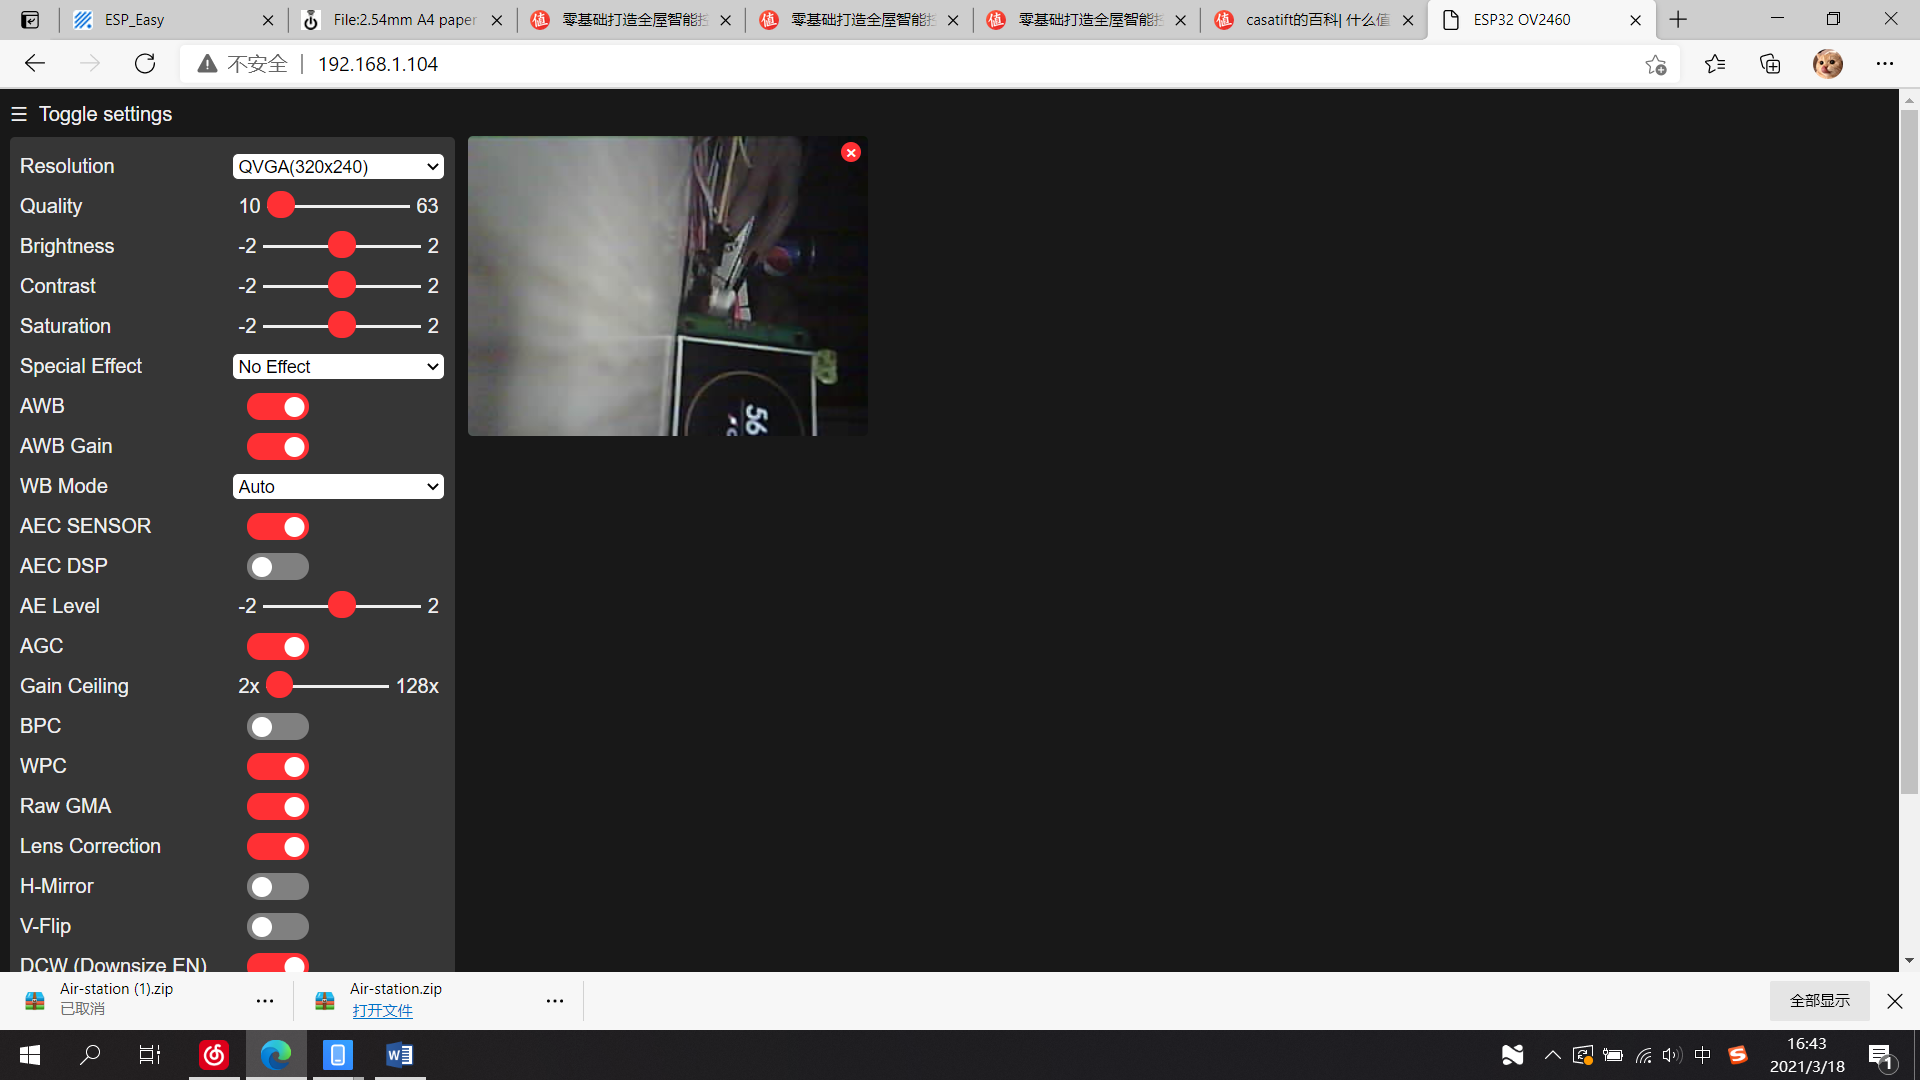
esp32-cam web界面显示

如图

img

py识别效果

效果如以下链接

1
https://v.youku.com/v_show/id_XNTE2MTUwNjA1Ng==.html

See

Prev:
基于ESP32智能空气站实现
Next:
基于HarmonyOS Next(5.0.0) 简单demo app实现